RadialGradient in SwiftUI
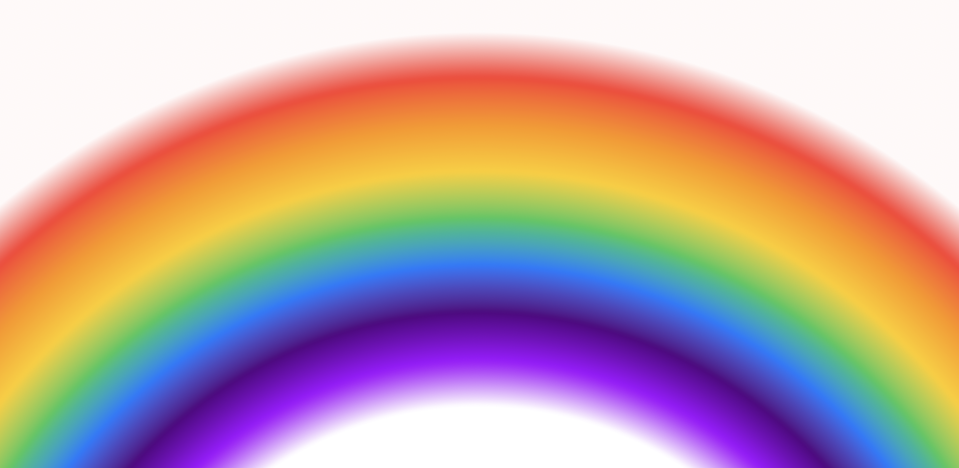
RadialGradient in SwiftUI is used to create a color gradient of two or more colors where the colors change as distance increases from a center point outwards. The colors are scaled to fit within the defined start and end radii.
The RadialGradient object is initialized with an array of colors that are shown
in increasing concentric circles ordered from a center point, with the initial color
filling in from the center point to the startRadius and the final color filling the
view outside the endRadius. SwiftUI automatically interpolates between the colors as
the circles increase. RadialGradient can be adjusted by changing its center and the
startRadius and endRadius parameters to create different effects.
Related articles on color gradients in SwiftUI:
- LinearGradient in SwiftUI
- AngularGradient in SwiftUI
- RadialGradient in SwiftUI
- Animate background with color gradient in SwiftUI
Simple Radial Gradient
We'll reuse the arrays of colors defined in LinearGradient in SwiftUI. The view shows RadialGradient with two colors and with seven colors, specifying the center point of the gradient as the center of the view. The initial color starts at the center (startRadius of 0) and moves outwards from the center to edge of the frame (endRadius of 150) in a frame that 300 by 300.
AppColors
 1struct AppColors {
 2    static let oneColor = [Color(hue: 0.01, saturation: 0.2, brightness: 0.9),
 3                           Color(hue: 0.01, saturation: 1.0, brightness: 0.9)]
 4
 5    static let twoColors = [Color.blue, .yellow]
 6
 7    static let rainbow = [
 8        Color.red,
 9        .orange,
10        .yellow,
11        .green,
12        .blue,
13        Color(hue: 0.773, saturation: 1.0, brightness: 0.51),
14        Color(hue: 0.771, saturation: 1.0, brightness: 1.00)
15    ]
16
17    static let rainbowClear = [
18        Color.clear,
19        .red,
20        .orange,
21        .yellow,
22        .green,
23        .blue,
24        Color(hue: 0.773, saturation: 1.0, brightness: 0.51),
25        Color(hue: 0.771, saturation: 1.0, brightness: 1.00),
26        .clear
27    ]
28}
StartRadialGradientView
 1struct StartRadialGradientView: View {
 2    var body: some View {
 3        VStack {
 4            Text("RadialGradient")
 5                .font(.largeTitle)
 6                .fontWeight(.bold)
 7            Divider()
 8
 9            VStack(spacing: 0) {
10                Text("Two colors")
11                    .font(.title)
12                    .fontWeight(.bold)
13
14                RoundedRectangle(cornerRadius: 20)
15                    .fill(
16                        RadialGradient(colors: AppColors.twoColors,
17                                       center: .center,
18                                       startRadius: 0,
19                                       endRadius: 150)
20                    )
21                    .frame(width: 300, height: 300)
22            }
23            Divider()
24
25            VStack(spacing: 0) {
26                Text("Seven colors")
27                    .font(.title)
28                    .fontWeight(.bold)
29
30                RoundedRectangle(cornerRadius: 20)
31                    .fill(
32                        RadialGradient(colors: AppColors.rainbow,
33                                       center: .center,
34                                       startRadius: 0,
35                                       endRadius: 150)
36                    )
37                    .frame(width: 300, height: 300)
38            }
39
40            Spacer()
41        }
42    }
43}
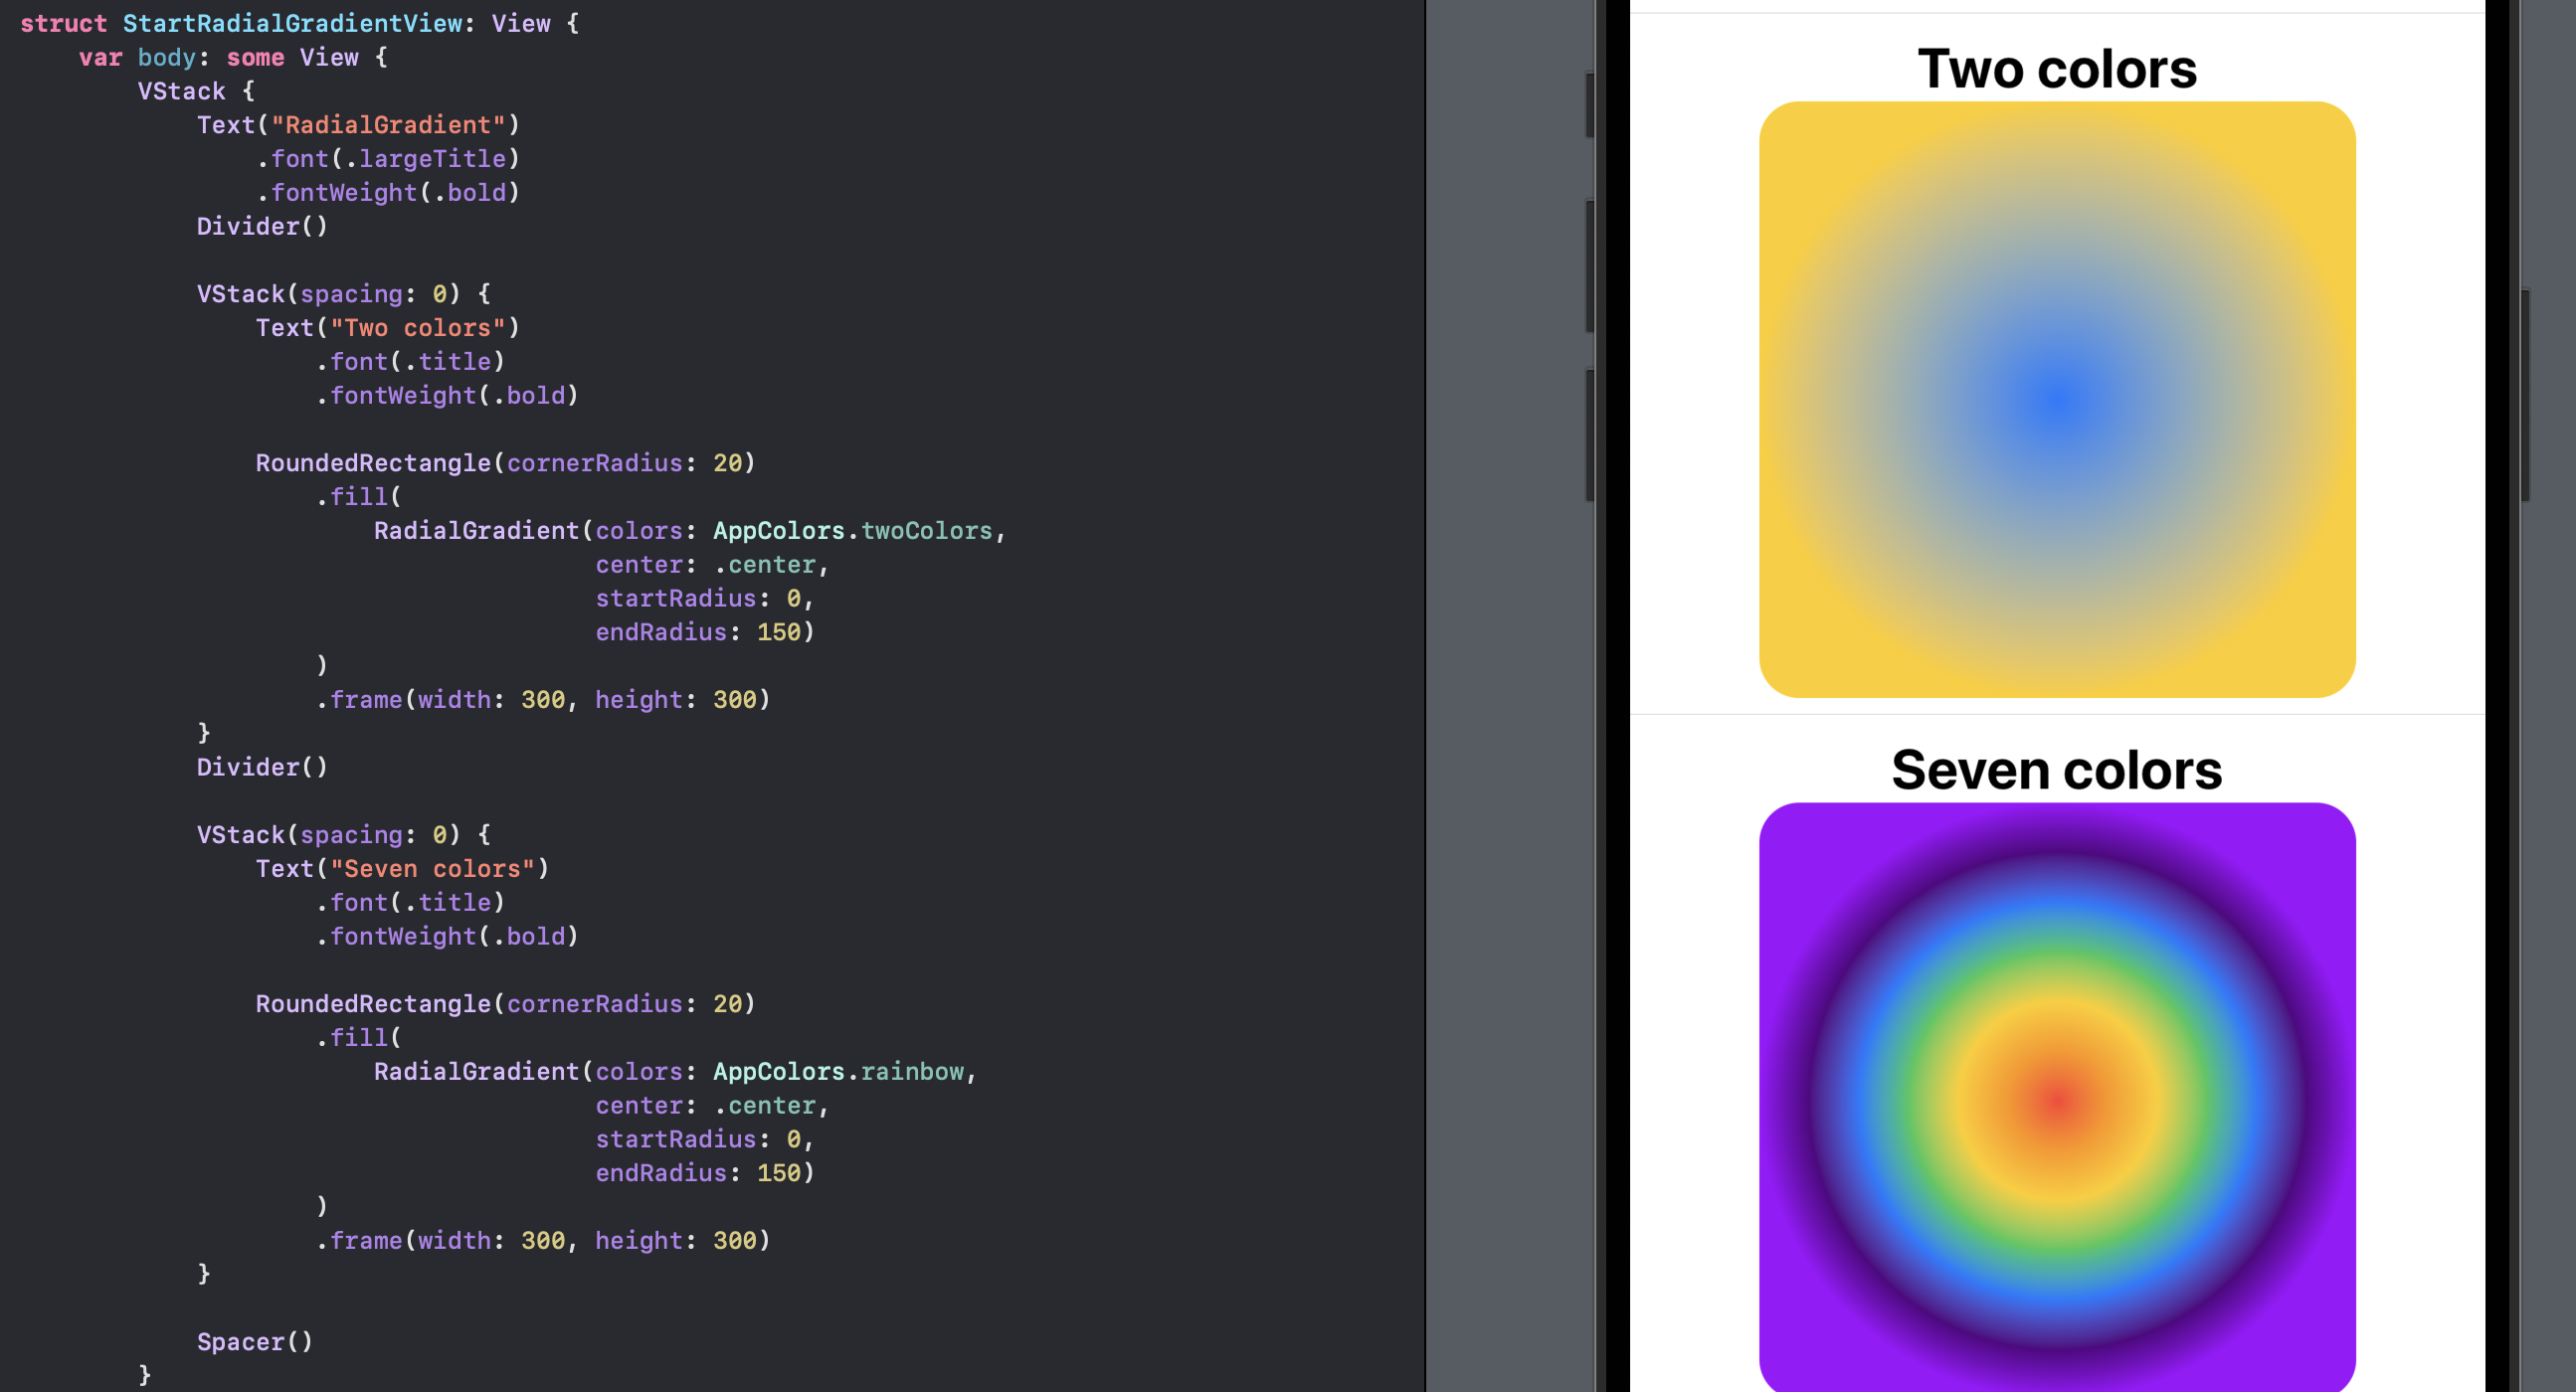
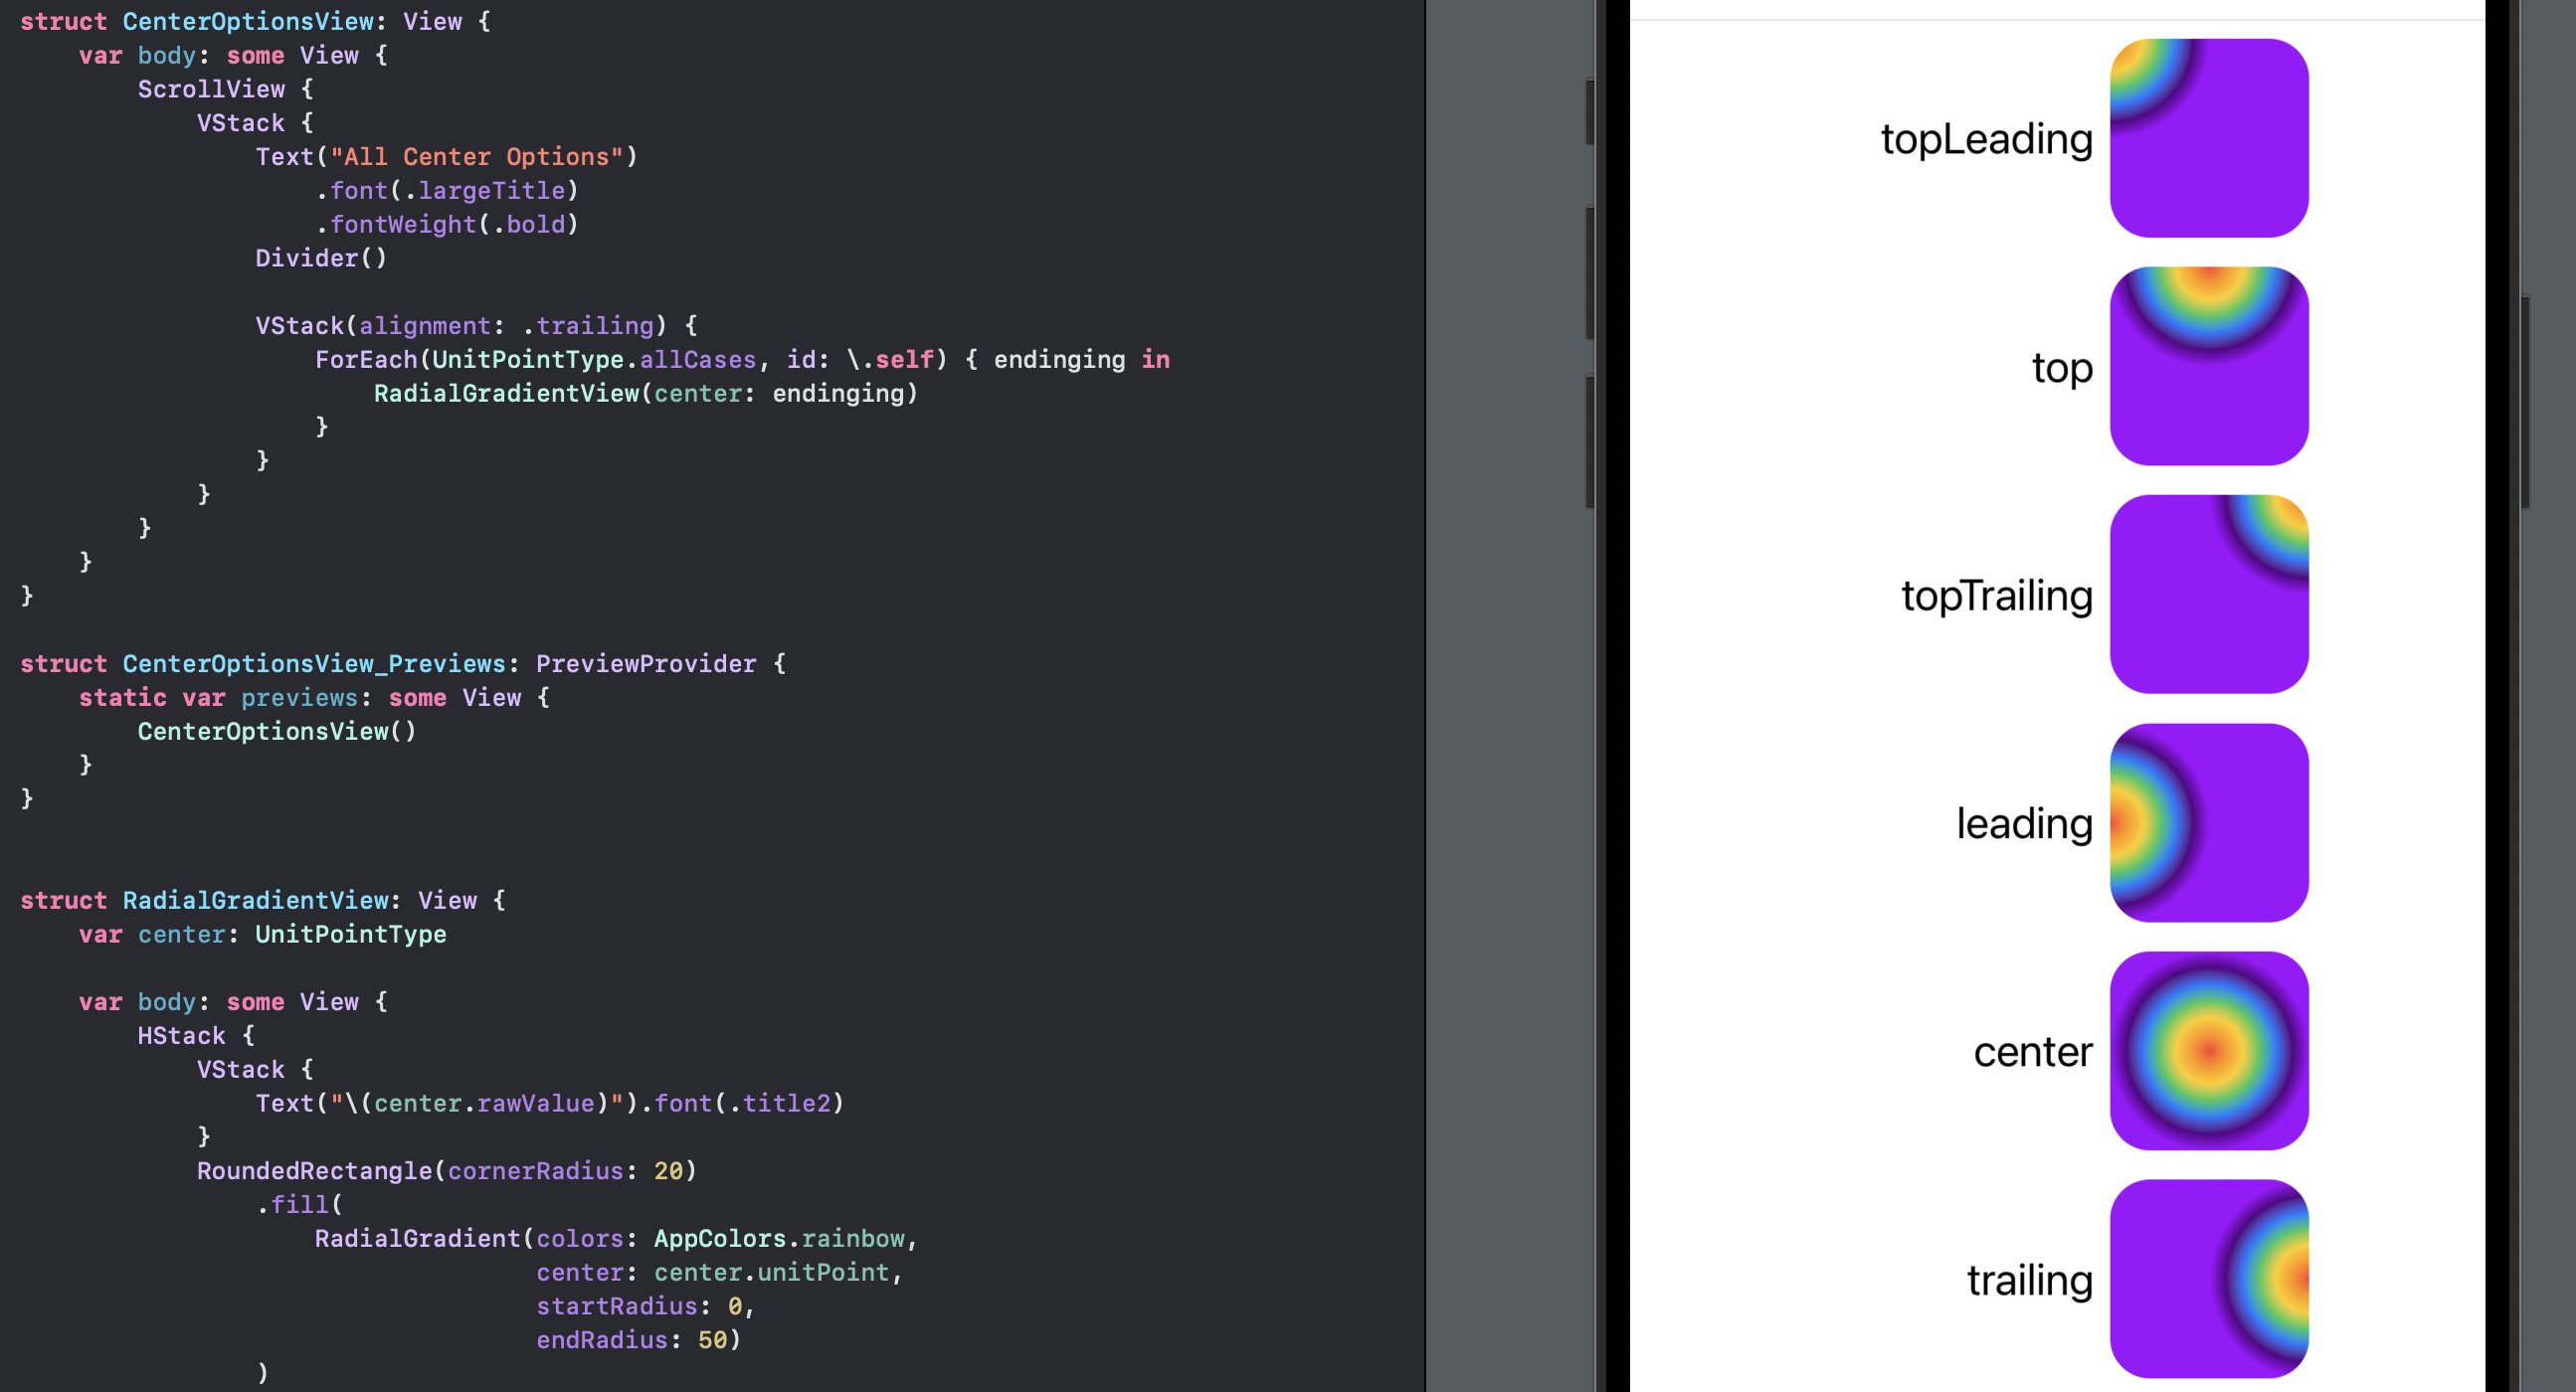
Standard center options of RadialGradient
An array of colors and a start and end radii are required to initialise a RadialGradient. This code displays how the seven colors are shown using the different standard center point options. The last color in the array of colors (violet) is used to fill in all the remaining area in the frame outside the endRadius.
RadialGradientView
 1struct RadialGradientView: View {
 2    var center: UnitPointType
 3
 4    var body: some View {
 5        HStack {
 6            VStack {
 7                Text("\(center.rawValue)").font(.title2)
 8            }
 9            RoundedRectangle(cornerRadius: 20)
10                .fill(
11                    RadialGradient(colors: AppColors.rainbow,
12                                   center: center.unitPoint,
13                                   startRadius: 0,
14                                   endRadius: 50)
15                )
16                .frame(width: 100, height: 100)
17        }
18    }
19}
CenterOptionsView
 1struct CenterOptionsView: View {
 2    var body: some View {
 3        ScrollView {
 4            VStack {
 5                Text("All Center Options")
 6                    .font(.largeTitle)
 7                    .fontWeight(.bold)
 8                Divider()
 9
10                VStack(alignment: .trailing) {
11                    ForEach(UnitPointType.allCases, id: \.self) { endinging in
12                        RadialGradientView(center: endinging)
13                    }
14                }
15            }
16        }
17    }
18}
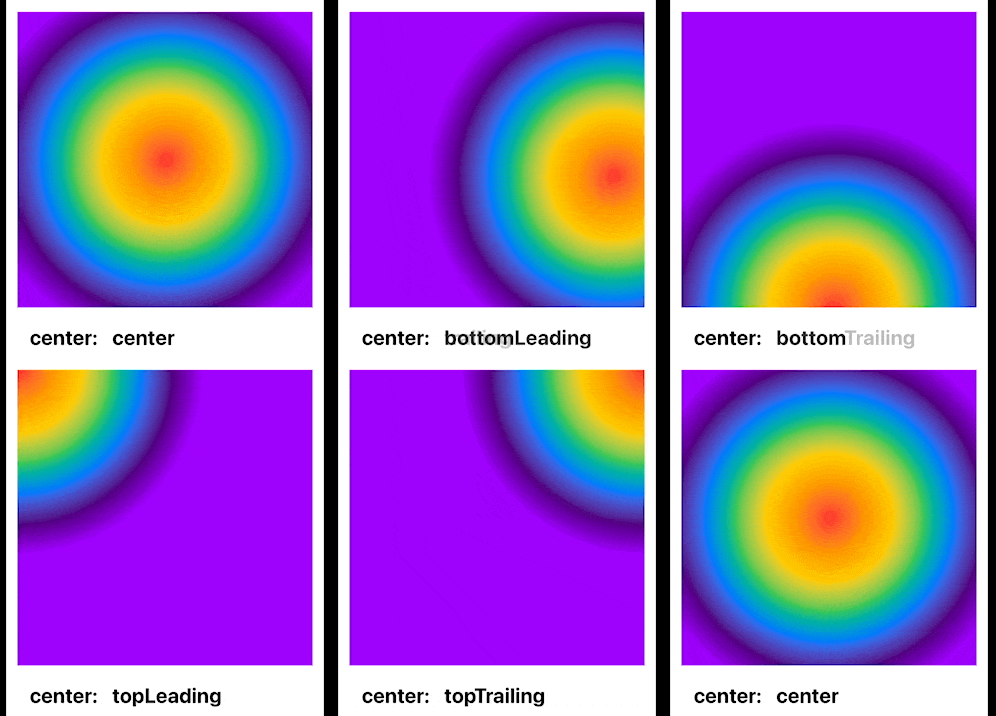
Animate movement of center of RadialGradient
It can be easier to see the effect of setting the center point of the RadialGradient by animating the change from one center point to another.
AnimateCenterView
 1struct AnimateCenterView: View {
 2    @State private var centerPointIndex = 4
 3
 4    let timer = Timer.publish(every: 2,
 5                              on: .main,
 6                              in: .common).autoconnect()
 7
 8    var body: some View {
 9        VStack {
10            Text("Move center")
11                .font(.largeTitle)
12                .fontWeight(.bold)
13
14            Rectangle()
15                .fill(
16                    RadialGradient(colors: AppColors.rainbow,
17                                   center: UnitPointType.allCases[centerPointIndex].unitPoint,
18                                   startRadius: 5,
19                                   endRadius: 250)
20                )
21                .animation(Animation.easeInOut.speed(0.2),
22                           value: centerPointIndex)
23                .frame(width: 400, height: 400)
24                .onReceive(timer) { input in
25                    centerPointIndex = (centerPointIndex + 1) % UnitPointType.allCases.count
26                }
27
28
29            VStack(alignment: .leading)  {
30                HStack() {
31                    Text("center: ")
32                    Text(" \(UnitPointType.allCases[centerPointIndex].rawValue)")
33                        .animation(Animation.easeInOut.speed(0.6),
34                               value: centerPointIndex)
35                    Spacer()
36                }
37                .padding()
38                .font(.title)
39                .fontWeight(.bold)
40            }
41
42            Spacer()
43        }
44        .padding()
45    }
46}
Setting start radius and end radius of RadialGradient
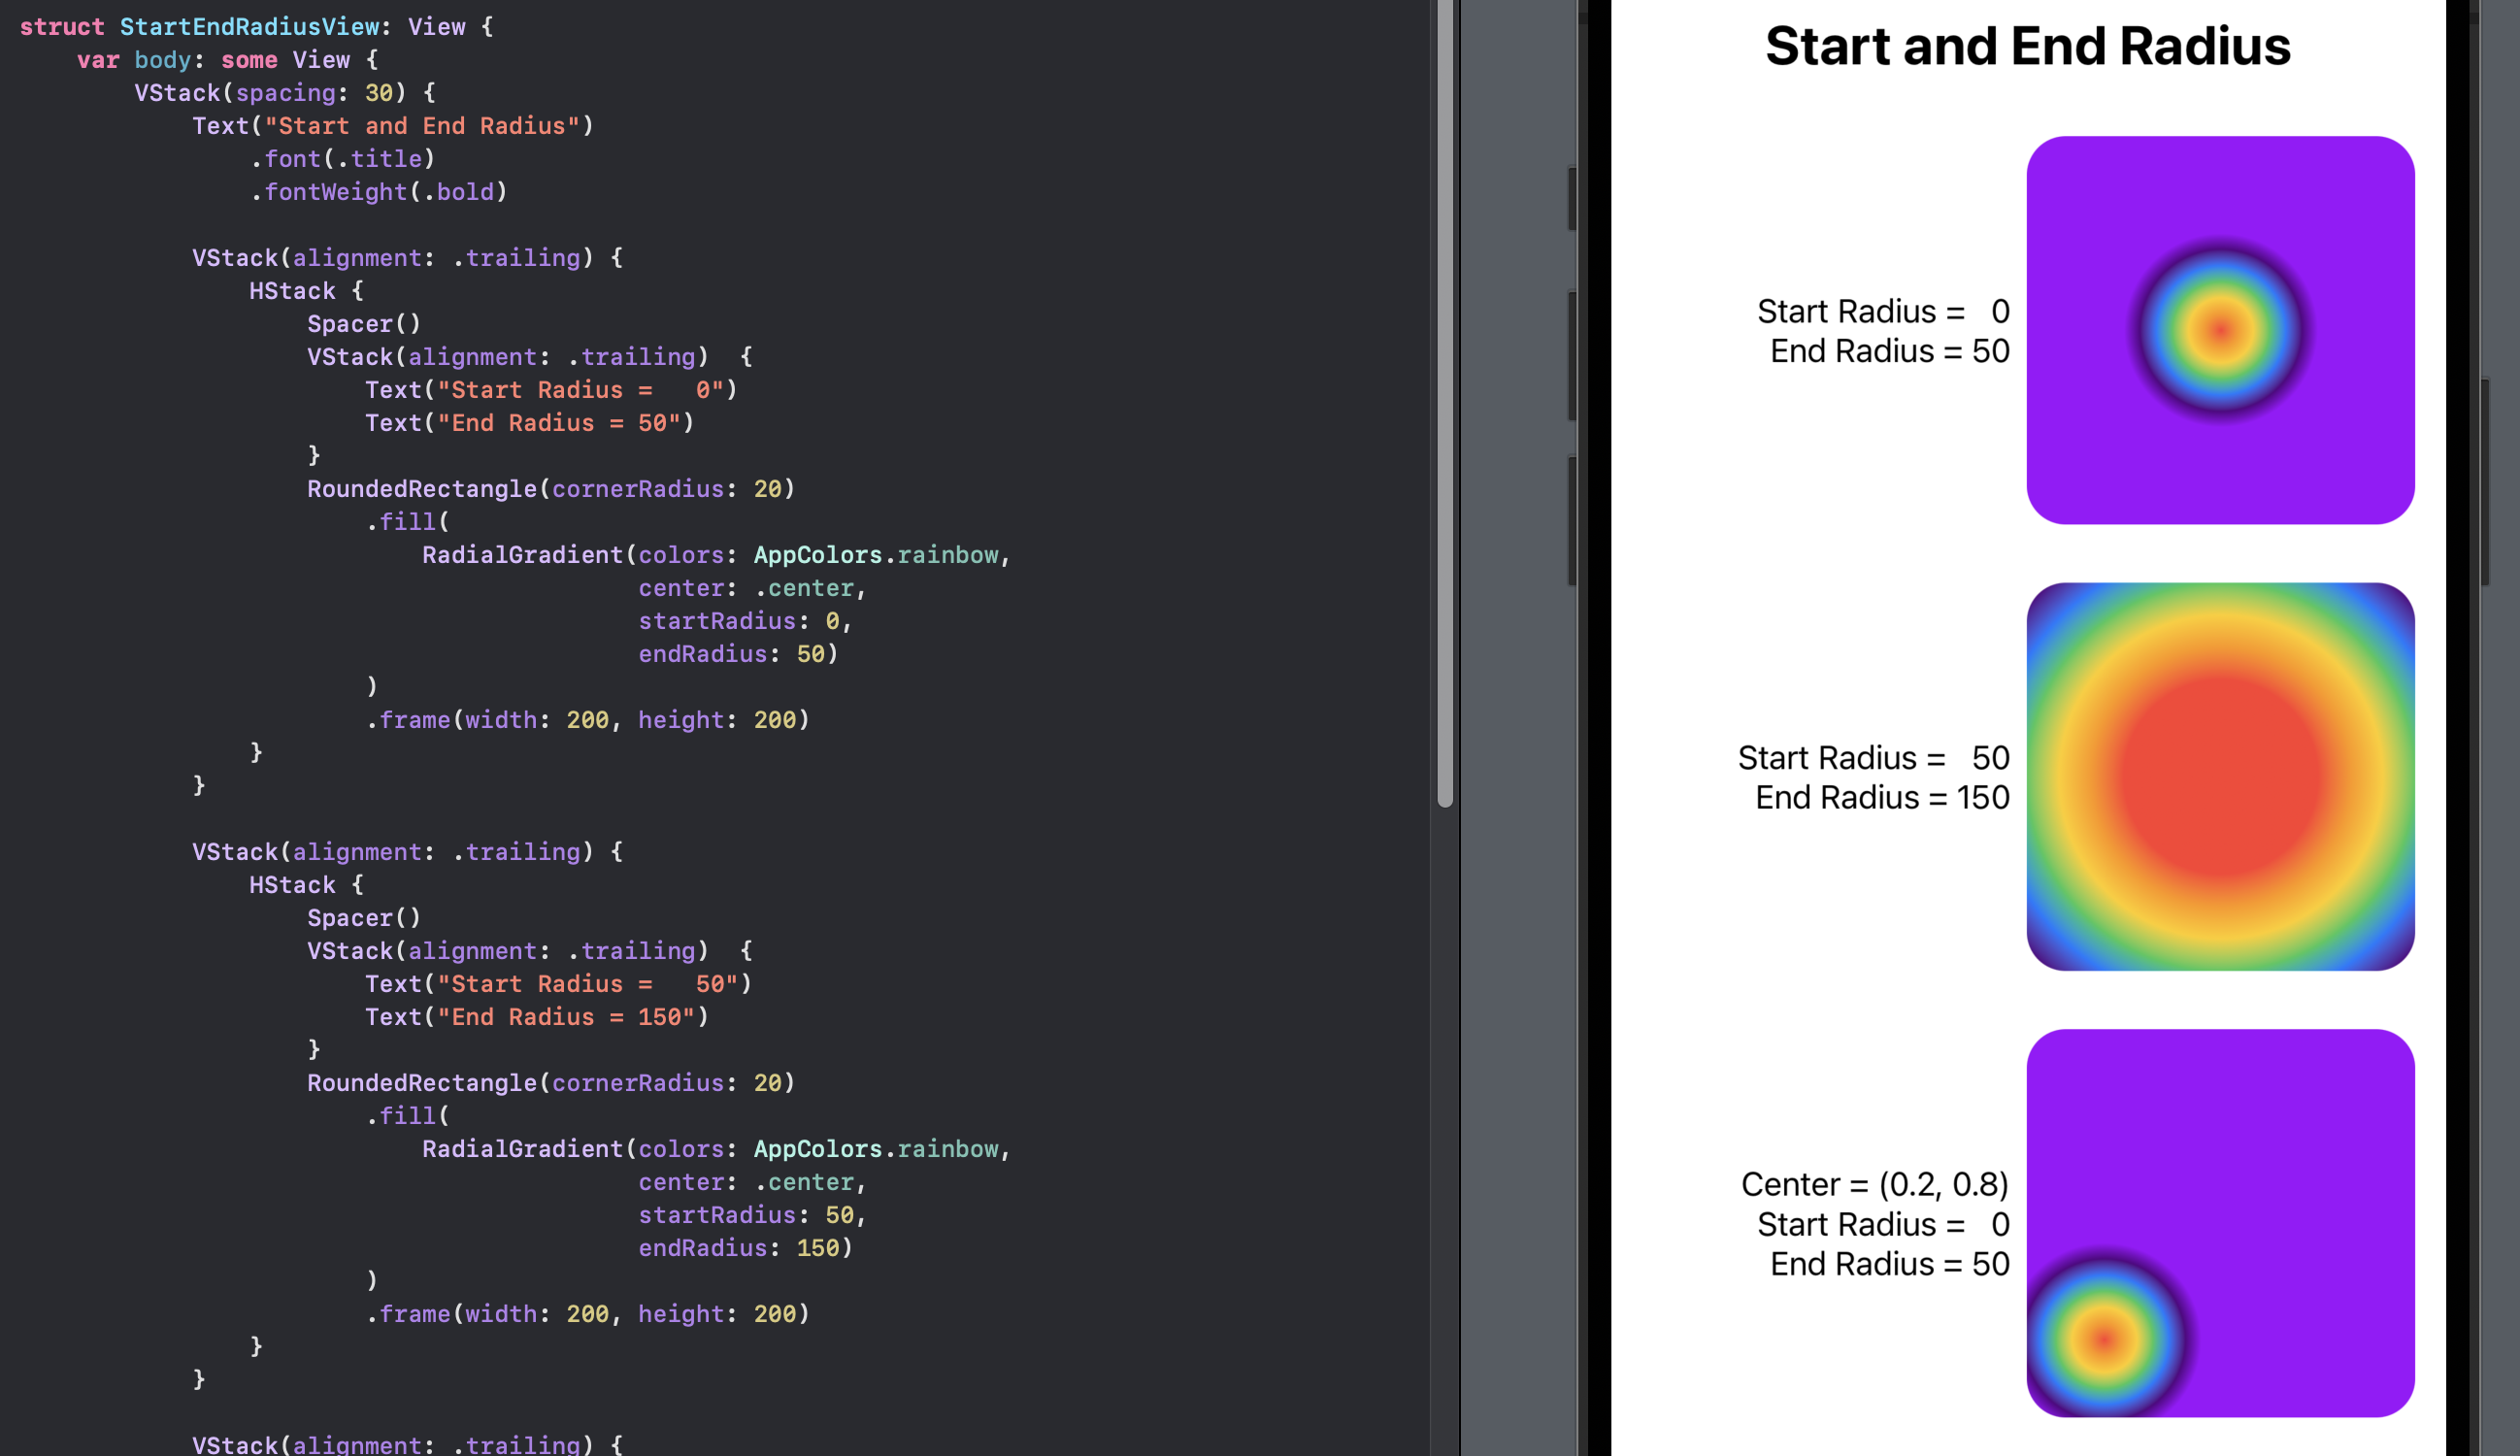
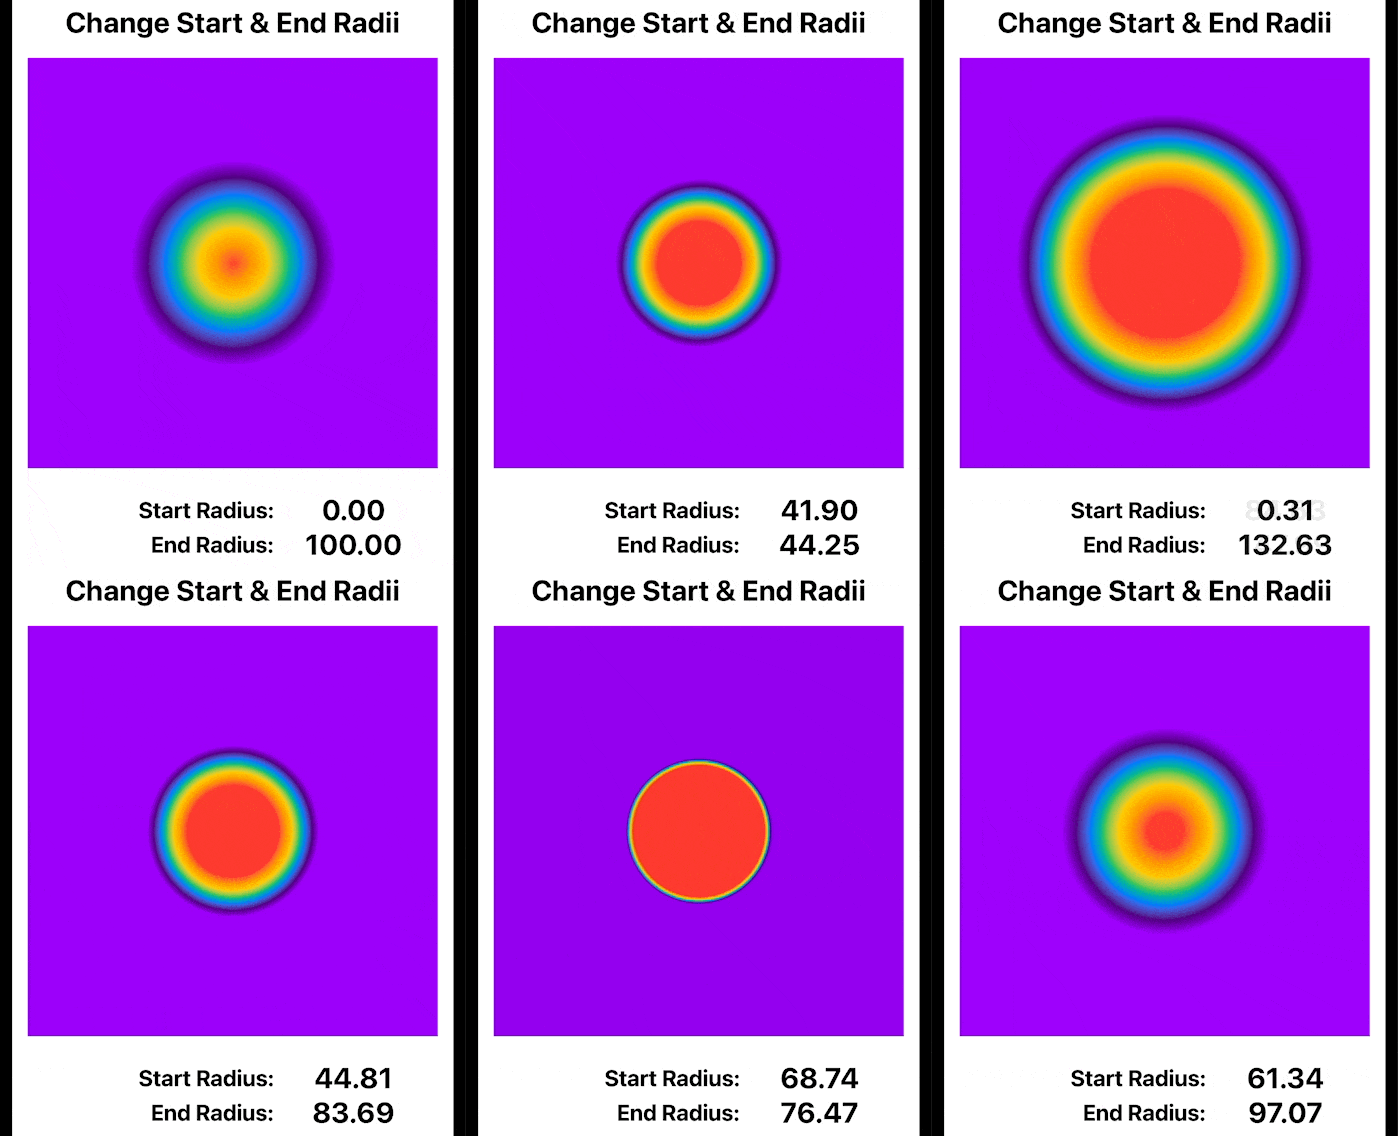
This code keeps the center point of the RadialGradient in the center of the frame and shows the effect of setting different start and end radii. The color from the center point to the startRadius is filled in with the initial color in the color array, while any area outside the endRadius is filled with the last color.
StartEndRadiusView
 1struct StartEndRadiusView: View {
 2    var body: some View {
 3        VStack(spacing: 30) {
 4            Text("Start and End Radius")
 5                .font(.title)
 6                .fontWeight(.bold)
 7
 8            VStack(alignment: .trailing) {
 9                HStack {
10                    Spacer()
11                    VStack(alignment: .trailing)  {
12                        Text("Start Radius =   0")
13                        Text("End Radius = 50")
14                    }
15                    RoundedRectangle(cornerRadius: 20)
16                        .fill(
17                            RadialGradient(colors: AppColors.rainbow,
18                                           center: .center,
19                                           startRadius: 0,
20                                           endRadius: 50)
21                        )
22                        .frame(width: 200, height: 200)
23                }
24            }
25
26            VStack(alignment: .trailing) {
27                HStack {
28                    Spacer()
29                    VStack(alignment: .trailing)  {
30                        Text("Start Radius =   50")
31                        Text("End Radius = 150")
32                    }
33                    RoundedRectangle(cornerRadius: 20)
34                        .fill(
35                            RadialGradient(colors: AppColors.rainbow,
36                                           center: .center,
37                                           startRadius: 50,
38                                           endRadius: 150)
39                        )
40                        .frame(width: 200, height: 200)
41                }
42            }
43
44            VStack(alignment: .trailing) {
45                HStack {
46                    Spacer()
47                    VStack(alignment: .trailing)  {
48                        Text("Center = (0.2, 0.8)")
49                        Text("Start Radius =   0")
50                        Text("End Radius = 50")
51                    }
52                    RoundedRectangle(cornerRadius: 20)
53                        .fill(
54                            RadialGradient(colors: AppColors.rainbow,
55                                           center: UnitPoint(x: 0.2, y: 0.8),
56                                           startRadius: 0,
57                                           endRadius: 50)
58                        )
59                        .frame(width: 200, height: 200)
60                }
61            }
62
63            Spacer()
64
65        }
66        .padding()
67    }
68}
AnimateRadiiView
 1struct AnimateRadiiView: View {
 2    @State private var startRadius:CGFloat = 0
 3    @State private var endRadius:CGFloat = 100
 4
 5    let timer = Timer.publish(every: 2,
 6                              on: .main,
 7                              in: .common).autoconnect()
 8
 9    func randomRadii() -> (CGFloat, CGFloat) {
10        let radius1 = CGFloat(Double.random(in: 0...100))
11        let radius2 = CGFloat(Double.random(in: 0...200))
12
13        return (min(radius1, radius2), max(radius1, radius2))
14    }
15
16    var body: some View {
17        VStack {
18            Text("Change Start & End Radii")
19                .font(.title)
20                .fontWeight(.bold)
21
22            Rectangle()
23                .fill(
24                    RadialGradient(colors: AppColors.rainbow,
25                                   center: .center,
26                                   startRadius: startRadius,
27                                   endRadius: endRadius)
28                )
29                .animation(Animation.easeInOut.speed(0.2),
30                           value: startRadius)
31                .frame(width: 400, height: 400)
32                .onReceive(timer) { _ in
33                    (startRadius, endRadius) = randomRadii()
34                }
35
36
37            VStack(alignment: .trailing)  {
38                HStack() {
39                    Spacer()
40                    Text("Start Radius: ")
41                        .font(.title2)
42                    Text("\(startRadius, specifier: "%.2F")")
43                        .font(.title)
44                        .frame(width: 130)
45                        .animation(Animation.easeInOut.speed(0.6),
46                                   value: startRadius)
47                }
48                HStack() {
49                    Spacer()
50                    Text("End Radius: ")
51                        .font(.title2)
52                    Text("\(endRadius, specifier: "%.2F")")
53                        .font(.title)
54                        .frame(width: 130)
55                        .animation(Animation.easeInOut.speed(0.6),
56                                   value: endRadius)
57                }
58            }
59            .padding()
60            .fontWeight(.bold)
61
62
63            Spacer()
64        }
65        .padding()
66    }
67}
Animate change of center, start and end radii of RadialGradient
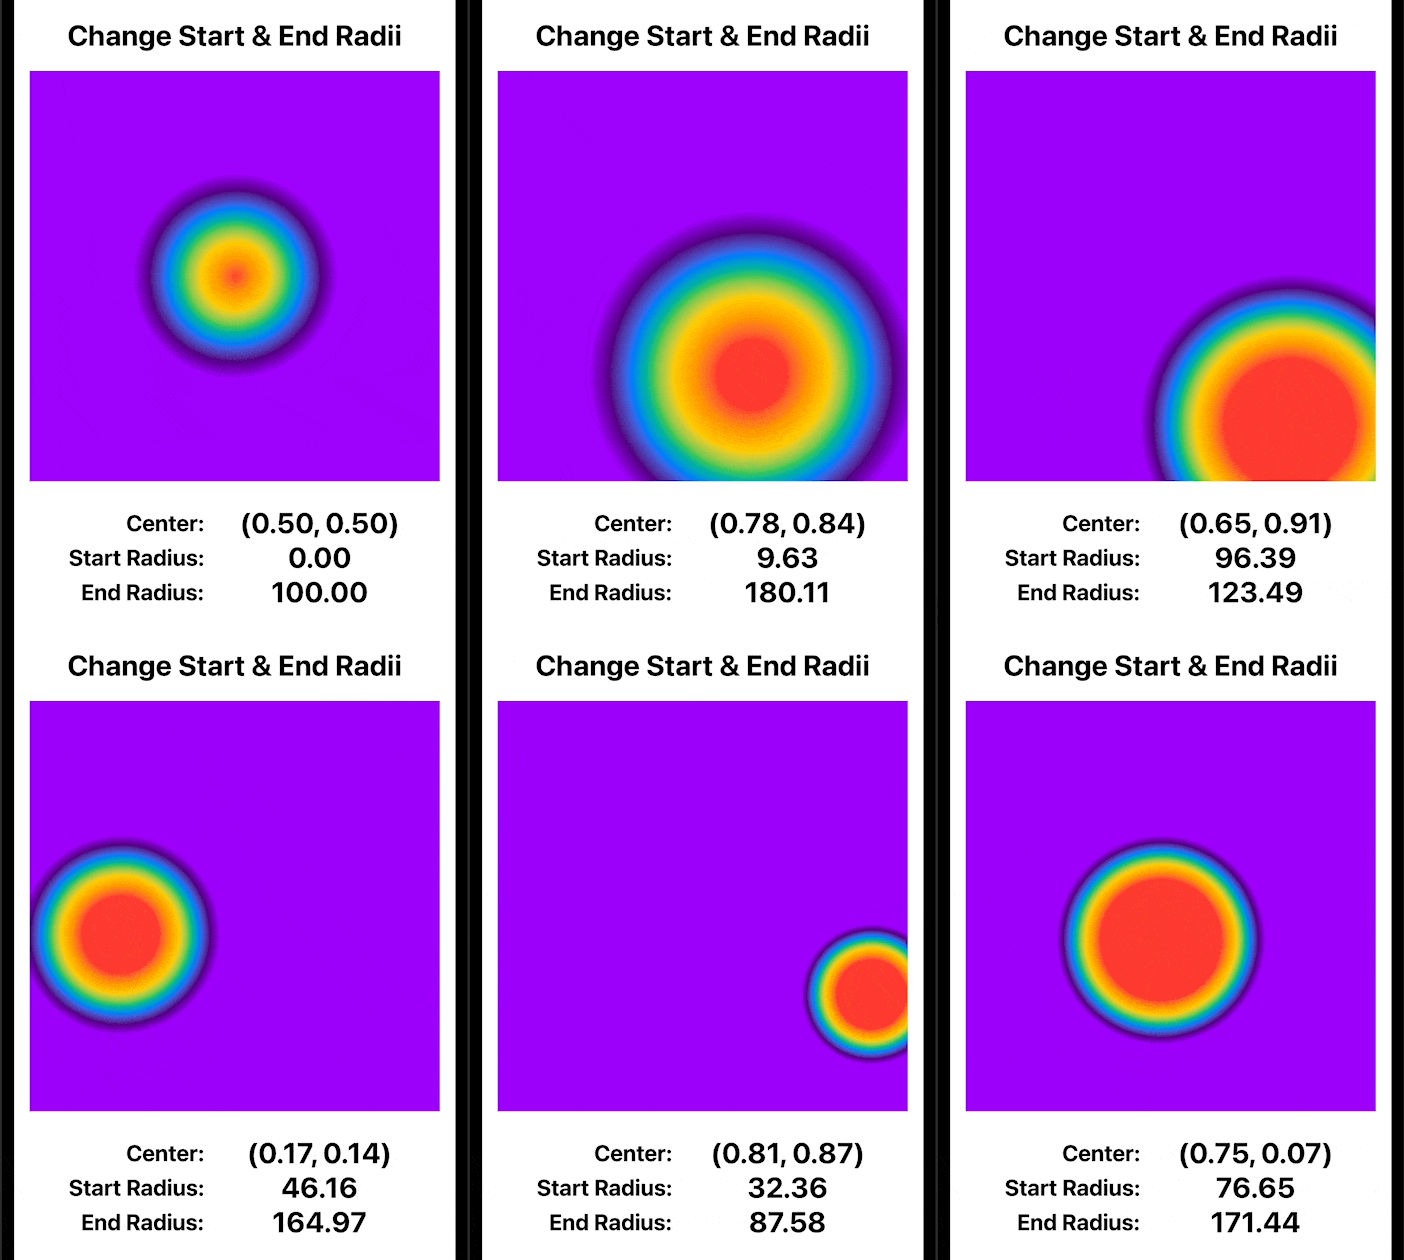
This code shows the effect of changine the center point as well as changing the start and end radii.
View
 1struct AnimateCenterRadiiView: View {
 2    @State private var centerPoint = UnitPoint(x: 0.5, y: 0.5)
 3    @State private var startRadius:CGFloat = 0
 4    @State private var endRadius:CGFloat = 100
 5
 6    let timer = Timer.publish(every: 2,
 7                              on: .main,
 8                              in: .common).autoconnect()
 9
10    func randomRadii() -> (CGFloat, CGFloat) {
11        let radius1 = CGFloat(Double.random(in: 0...100))
12        let radius2 = CGFloat(Double.random(in: 0...200))
13
14        return (min(radius1, radius2), max(radius1, radius2))
15    }
16
17    func randomPoint() -> UnitPoint {
18        return UnitPoint(x: Double.random(in: 0...1),
19                         y: Double.random(in: 0...1))
20    }
21
22    var body: some View {
23        VStack {
24            Text("Change \nCenter, \nStart & End Radii")
25                .font(.title)
26                .fontWeight(.bold)
27
28            Rectangle()
29                .fill(
30                    RadialGradient(colors: AppColors.rainbow,
31                                   center: centerPoint,
32                                   startRadius: startRadius,
33                                   endRadius: endRadius)
34                )
35                .animation(Animation.easeInOut.speed(0.2),
36                           value: startRadius)
37                .frame(width: 400, height: 400)
38                .onReceive(timer) { _ in
39                    (startRadius, endRadius) = randomRadii()
40                    centerPoint = randomPoint()
41                }
42
43
44            VStack(alignment: .trailing)  {
45                HStack() {
46                    Spacer()
47                    Text("Center: ")
48                        .font(.title2)
49                    Text("(\(centerPoint.x, specifier: "%.2F"), \(centerPoint.y, specifier: "%.2F"))")
50                        .font(.title)
51                        .frame(width: 200)
52                        .animation(Animation.easeInOut.speed(0.6),
53                                   value: centerPoint)
54                }
55                HStack() {
56                    Spacer()
57                    Text("Start Radius: ")
58                        .font(.title2)
59                    Text("\(startRadius, specifier: "%.2F")")
60                        .font(.title)
61                        .frame(width: 200)
62                        .animation(Animation.easeInOut.speed(0.6),
63                                   value: startRadius)
64                }
65                HStack() {
66                    Spacer()
67                    Text("End Radius: ")
68                        .font(.title2)
69                    Text("\(endRadius, specifier: "%.2F")")
70                        .font(.title)
71                        .frame(width: 200)
72                        .animation(Animation.easeInOut.speed(0.6),
73                                   value: endRadius)
74                }
75            }
76            .padding()
77            .fontWeight(.bold)
78
79
80            Spacer()
81        }
82        .padding()
83    }
84}
Iterate through colors
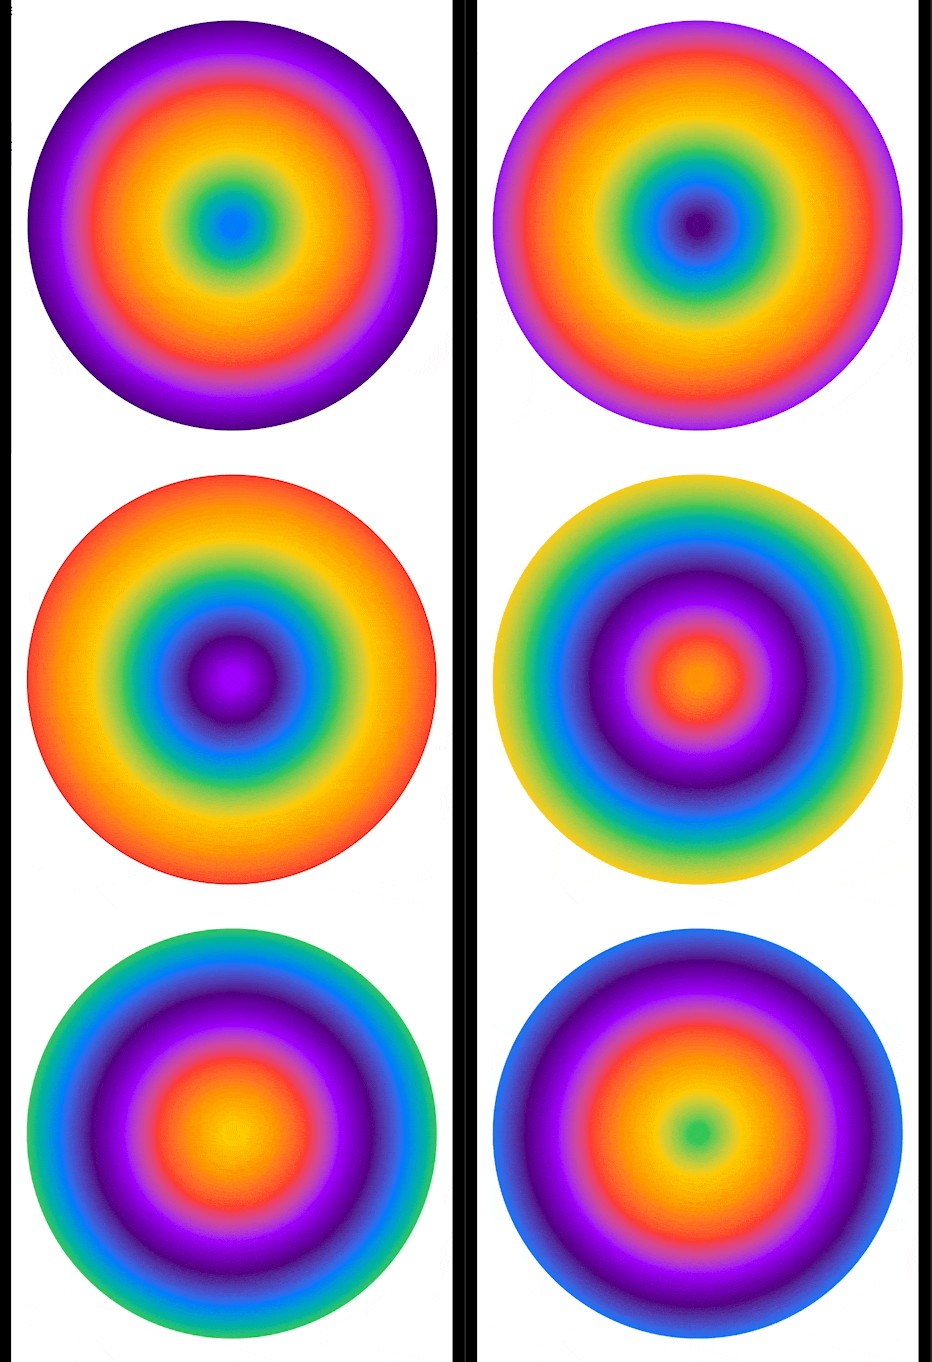
I find this view unpleasant to look at, it moves the colors out from the center to the outside by creating a new array of colors with the colors offset by 1.
HypnoticView
 1struct HypnoticView: View {
 2    @State private var colorIndex = 0
 3    @State private var colors = AppColors.rainbow
 4
 5    let timer = Timer.publish(every: 0.12,
 6                              on: .main,
 7                              in: .common).autoconnect()
 8    func colorList() -> [Color] {
 9        colorIndex += 1
10        return AppColors.rainbow.indices.map  { AppColors.rainbow.wrap(index: (colorIndex - $0)) }
11    }
12
13    var body: some View {
14        VStack(alignment: .trailing) {
15
16            Circle()
17                .fill(
18                    RadialGradient(colors: colors,
19                                   center: .center,
20                                   startRadius: 10,
21                                   endRadius: 200)
22                )
23                .animation(Animation.easeInOut.speed(0.12),
24                           value: colorIndex)
25                .frame(width: 400, height: 400)
26                .onReceive(timer) { _ in
27                    colors = colorList()
28                }
29        }
30    }
31}
32
33
34extension Array {
35    func wrap(index: Int) -> Element {
36        let wrappedIndex = index >= 0 ? index % self.count : self.count + index % self.count
37        return self[wrappedIndex]
38    }
39}
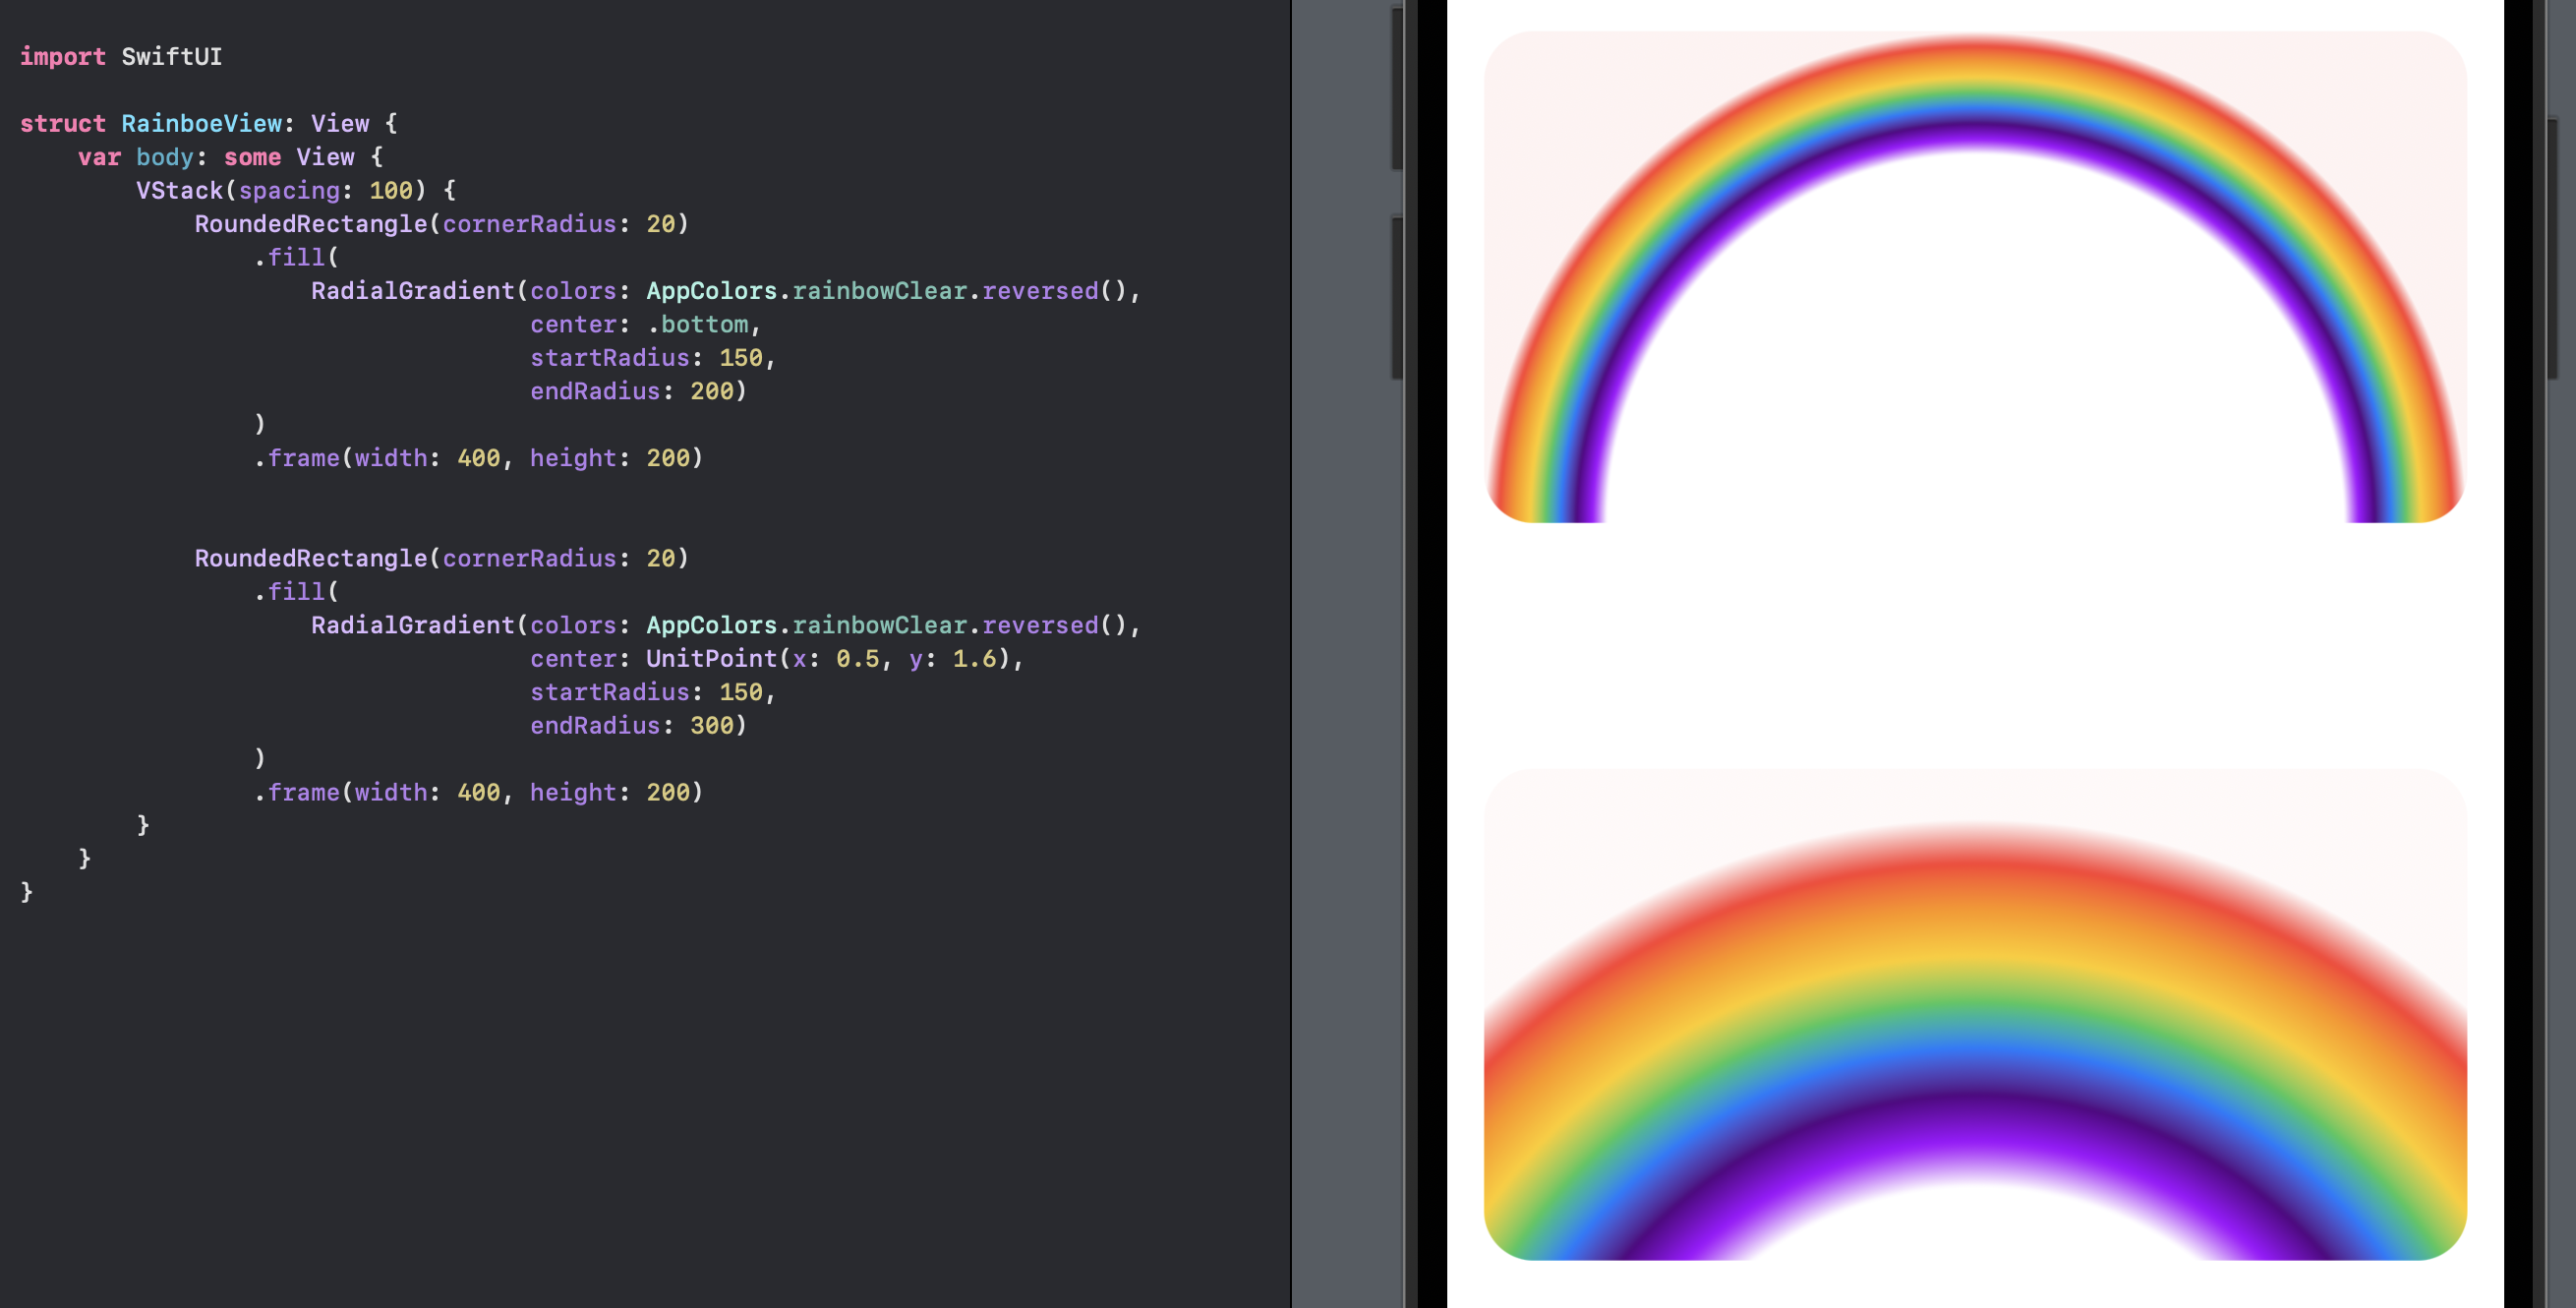
Create rainbow with RadialGradient
Finally, RadialGradient can be used to show a rainbow. It requires the array of colors to begin and end with a clear color as well as setting the center point of the RadialGradient outside the frame.
RainbowView
 1struct RainbowView: View {
 2    var body: some View {
 3        VStack(spacing: 100) {
 4            RoundedRectangle(cornerRadius: 20)
 5                .fill(
 6                    RadialGradient(colors: AppColors.rainbowClear.reversed(),
 7                                   center: .bottom,
 8                                   startRadius: 150,
 9                                   endRadius: 200)
10                )
11                .frame(width: 400, height: 200)
12
13
14            RoundedRectangle(cornerRadius: 20)
15                .fill(
16                    RadialGradient(colors: AppColors.rainbowClear.reversed(),
17                                   center: UnitPoint(x: 0.5, y: 1.6),
18                                   startRadius: 150,
19                                   endRadius: 300)
20                )
21                .frame(width: 400, height: 200)
22        }
23    }
24}
Conclusion
RadialGradient is used to transition from one color to another, optionally through a range of colors in a circular pattern radiating outwards from a center point. This article explored the effect of setting different center points as well as specifying a range of start and end radii for the gradients. RadialGradient can be used to create visually compelling effects in SwiftUI views, especially when used in circular shapes or combined with other colors.
The source code for RadialGradientApp is available on GitHub.