Can ChatGPT create an iOS app in SwiftUI - part 1
Artificial Intelligence is trending at the moment with applications like DALL-E and Canva able to create images in certain styles and ChatGPT able to generate text. This article explores if ChatGPT can do more than childrens homework and see can ChatGPT create an iOS task app in SwiftUI. So I asked it to create a task manager app.
The ChatGPT site can get busy and you may frequently get a message that "ChatGPT is at capacity right now".
Related articles on ChatGPT and SwiftUI:
- Can ChatGPT create an iOS app in SwiftUI - part 1
- Can ChatGPT create an iOS app in SwiftUI - part 2
- Create a circular slider in SwiftUI with ChatGPT
Tips on using chatGPT to generate code
- Use version control and commit the code when it compiles
- Compile the code after every change from chatGPT
- Use 'Regenerate response' if not happy with the code generated
- Feedback compile errors to chatGPT for a possible solution
- Be prepared to roll back to a previous version and edit the request to chatGPT from there and try again
Ask chatGPT to create an app
It is necessary to create an account with ChatGPT and log in to start a conversation. I simply ask chatGPT to create an app in SwiftUI.
First prompt to create the app
Create task management app in SwiftUI using MVVM design for iPhone
Response from chatGPT
Sure, I can guide you on how to create a task management app in SwiftUI using the MVVM design pattern for iPhone. Here are the steps to follow:
Step 1: Create a new SwiftUI project in Xcode.
Step 2: Create a new file for the model, Task.swift.
Model
1struct Task: Identifiable {
2    var id = UUID()
3    var title: String
4    var completed: Bool = false
5}
Step 3: Create a new file for the ViewModel, TaskViewModel.swift.
ViewModel
1class TaskViewModel: ObservableObject {
2    @Published var tasks = [
3        Task(title: "Task 1"),
4        Task(title: "Task 2"),
5        Task(title: "Task 3")
6    ]
7}
Step 4: Create a new file for the View, ContentView.swift.
View
 1struct ContentView: View {
 2    @ObservedObject var viewModel = TaskViewModel()
 3
 4    var body: some View {
 5        NavigationView {
 6            List(viewModel.tasks) { task in
 7                Text(task.title)
 8            }
 9            .navigationTitle("Tasks")
10        }
11    }
12}
Step 5: Run the app on an iPhone simulator to see the list of tasks.
Step 6: Add a button to mark a task as completed in the ContentView.
View
 1struct ContentView: View {
 2    @ObservedObject var viewModel = TaskViewModel()
 3
 4    var body: some View {
 5        NavigationView {
 6            List(viewModel.tasks) { task in
 7                Button(action: {
 8                    if let index = self.viewModel.tasks.firstIndex(where: { $0.id == task.id }) {
 9                        self.viewModel.tasks[index].completed.toggle()
10                    }
11                }) {
12                    HStack {
13                        Image(systemName: task.completed ? "checkmark.circle.fill" : "circle")
14                        Text(task.title)
15                    }
16                }
17            }
18            .navigationTitle("Tasks")
19        }
20    }
21}
Step 7: Run the app again to see the checkmarks appearing when tasks are completed.
Step 8: Add a new task button to the ContentView.
View
 1struct ContentView: View {
 2    @ObservedObject var viewModel = TaskViewModel()
 3
 4    var body: some View {
 5        NavigationView {
 6            List(viewModel.tasks) { task in
 7                Button(action: {
 8                    if let index = self.viewModel.tasks.firstIndex(where: { $0.id == task.id }) {
 9                        self.viewModel.tasks[index].completed.toggle()
10                    }
11                }) {
12                    HStack {
13                        Image(systemName: task.completed ? "checkmark.circle.fill" : "circle")
14                        Text(task.title)
15                    }
16                }
17            }
18            .navigationTitle("Tasks")
19            .navigationBarItems(trailing: Button(action: {
20                self.viewModel.tasks.append(Task(title: "New Task"))
21            }) {
22                Image(systemName: "plus")
23            })
24        }
25    }
26}
Step 9: Run the app again to see the new task button appearing in the navigation bar.
That's it! You have successfully created a task management app in SwiftUI using the MVVM design pattern for iPhone.

Add more details to a Task
Well, so far so good, but the Task model just has a title. Let's see if we can add more details to the Tasks.
Next prompt to chatGPT
add a due date to the task and a task status field
Response from chatGPT
Sure, here are the steps to add a due date and a task status field to the task management app:
Step 1: Update the Task model in Task.swift to include the due date and the task status fields.
Task.swift
1struct Task: Identifiable {
2    var id = UUID()
3    var title: String
4    var completed: Bool = false
5    var dueDate: Date? // new field for due date
6    var status: String? // new field for task status
7}
Step 2: Update the TaskViewModel class in TaskViewModel.swift to include the due date and the task status fields.
TaskViewModel.swift
1class TaskViewModel: ObservableObject {
2    @Published var tasks = [
3        Task(title: "Task 1", dueDate: Date(), status: "In progress"),
4        Task(title: "Task 2", dueDate: Date().addingTimeInterval(86400), status: "Not started"),
5        Task(title: "Task 3", dueDate: nil, status: "Complete")
6    ]
7}
Step 3: Update the ContentView to display the due date and the task status in the list.
ContentView.swift
 1struct ContentView: View {
 2    @ObservedObject var viewModel = TaskViewModel()
 3
 4    static let taskDateFormat: DateFormatter = {
 5        let formatter = DateFormatter()
 6        formatter.dateStyle = .medium
 7        return formatter
 8    }()
 9
10    var body: some View {
11        NavigationView {
12            List(viewModel.tasks) { task in
13                VStack(alignment: .leading) {
14                    Text(task.title)
15                    if let dueDate = task.dueDate {
16                        Text("Due date: \(dueDate, formatter: Self.taskDateFormat)")
17                            .font(.caption)
18                    }
19                    if let status = task.status {
20                        Text("Status: \(status)")
21                            .font(.caption)
22                    }
23                }
24                .foregroundColor(task.completed ? .gray : .primary)
25                .opacity(task.completed ? 0.5 : 1)
26                .onTapGesture {
27                    if let index = self.viewModel.tasks.firstIndex(where: { $0.id == task.id }) {
28                        self.viewModel.tasks[index].completed.toggle()
29                    }
30                }
31            }
32            .navigationTitle("Tasks")
33            .navigationBarItems(trailing: Button(action: {
34                self.viewModel.tasks.append(Task(title: "New Task", dueDate: Date(), status: "Not started"))
35            }) {
36                Image(systemName: "plus")
37            })
38        }
39    }
40}
Step 4: Run the app on an iPhone simulator to see the due date and the task status appearing in the list.
Step 5: Update the new task button to include the due date and the task status fields.
Step 6: Run the app again to see the new task button creating tasks with the due date and the task status fields.
That's it! You have successfully added a due date and a task status field to the task management app.

Add unit tests
Now that I have the beginings of an app, I decide to go mad and ask chatGPT to add unit tests.
Next prompt to chatGPT
Add unit tests
Response from chatGPT
Sure, adding unit tests to the task management app is a great way to ensure that the code is working as expected and to catch any issues before they reach production. Here are the steps to add unit tests to the app:
Step 1: Create a new file called TaskViewModelTests.swift in the same directory as TaskViewModel.swift.
Step 2: In TaskViewModelTests.swift, import XCTest and the app's code.
TaskViewModelTests.swift
1import XCTest
2@testable import TaskManager
Step 3: Define a class for the unit tests and a variable for the TaskViewModel.
TaskViewModelTests.swift
1class TaskViewModelTests: XCTestCase {
2    var viewModel: TaskViewModel!
3}
Step 4: Override the setUp() method to create a new instance of TaskViewModel.
TaskViewModelTests.swift
1override func setUp() {
2    viewModel = TaskViewModel()
3}
Step 5: Write a unit test for the add task functionality.
TaskViewModelTests.swift
1func testAddTask() {
2    let initialCount = viewModel.tasks.count
3    viewModel.tasks.append(Task(title: "New Task", dueDate: Date(), status: "Not started"))
4    let finalCount = viewModel.tasks.count
5    XCTAssertEqual(finalCount, initialCount + 1)
6}
Step 6: Write a unit test for the toggle completed functionality.
TaskViewModelTests.swift
1func testToggleCompleted() {
2    let task = Task(title: "Task", dueDate: Date(), status: "In progress")
3    viewModel.tasks.append(task)
4    viewModel.tasks[0].completed.toggle()
5    XCTAssertTrue(viewModel.tasks[0].completed)
6}
Step 7: Write a unit test for the due date and the task status fields.
TaskViewModelTests.swift
1func testDueDateAndStatus() {
2    let task = Task(title: "Task", dueDate: Date(), status: "In progress")
3    viewModel.tasks.append(task)
4    XCTAssertNotNil(viewModel.tasks[0].dueDate)
5    XCTAssertEqual(viewModel.tasks[0].status, "In progress")
6}
Step 8: Override the tearDown() method to set the TaskViewModel to nil.
TaskViewModelTests.swift
1override func tearDown() {
2    viewModel = nil
3}
Step 9: Run the unit tests and ensure that they all pass.
That's it! You have successfully added unit tests to the task management app. You can continue to add more unit tests as needed to ensure that the code is working as expected.

Change Task Status to be ENUM
The Status property in Task was created as an optional string, it would be better if this was an enum.
Next prompt to chatGPT
change task status to be one of "not started" "in progress" or "complete"
Response from chatGPT
Sure, here are the steps to change the task status to be one of "not started", "in progress", or "complete" in the task management app:
Step 1: Update the Task model in Task.swift to use an enumeration for the task status.
Task.swift
 1enum TaskStatus: String, CaseIterable {
 2    case notStarted = "Not started"
 3    case inProgress = "In progress"
 4    case complete = "Complete"
 5}
 6
 7struct Task: Identifiable {
 8    var id = UUID()
 9    var title: String
10    var completed: Bool = false
11    var dueDate: Date?
12    var status: TaskStatus = .notStarted // update status field to use enumeration
13}
Step 2: Update the TaskViewModel class in TaskViewModel.swift to use the TaskStatus enumeration and to initialize the task status field to .notStarted.
TaskViewModel.swift
1class TaskViewModel: ObservableObject {
2    @Published var tasks = [
3        Task(title: "Task 1", dueDate: Date(), status: .inProgress),
4        Task(title: "Task 2", dueDate: Date().addingTimeInterval(86400), status: .notStarted),
5        Task(title: "Task 3", dueDate: nil, status: .complete)
6    ]
7}
Step 3: Update the ContentView to use the TaskStatus enumeration and to update the task status based on user selection.
ContentView.swift
 1struct ContentView: View {
 2    @ObservedObject var viewModel = TaskViewModel()
 3
 4    static let taskDateFormat: DateFormatter = {
 5        let formatter = DateFormatter()
 6        formatter.dateStyle = .medium
 7        return formatter
 8    }()
 9
10    var body: some View {
11        NavigationView {
12            List(viewModel.tasks) { task in
13                VStack(alignment: .leading) {
14                    Text(task.title)
15                    if let dueDate = task.dueDate {
16                        Text("Due date: \(dueDate, formatter: Self.taskDateFormat)")
17                            .font(.caption)
18                    }
19                    Text("Status:")
20                    Picker("Task Status", selection: $viewModel.tasks[viewModel.tasks.firstIndex(of: task)!].status) {
21                        ForEach(TaskStatus.allCases, id: \.self) { status in
22                            Text(status.rawValue).tag(status)
23                        }
24                    }
25                    .pickerStyle(SegmentedPickerStyle())
26                }
27                .foregroundColor(task.completed ? .gray : .primary)
28                .opacity(task.completed ? 0.5 : 1)
29                .onTapGesture {
30                    if let index = self.viewModel.tasks.firstIndex(where: { $0.id == task.id }) {
31                        self.viewModel.tasks[index].completed.toggle()
32                    }
33                }
34            }
35            .navigationTitle("Tasks")
36            .navigationBarItems(trailing: Button(action: {
37                self.viewModel.tasks.append(Task(title: "New Task", dueDate: Date(), status: .notStarted))
38            }) {
39                Image(systemName: "plus")
40            })
41        }
42    }
43}
Step 4: Run the app on an iPhone simulator to see the updated task status options in the list and the ability to update the task status.
Step 5: Update the unit tests to ensure that the new task status enumeration is being used correctly.
That's it! You have successfully changed the task status to be one of "not started", "in progress", or "complete" in the task management app.
Next prompt to chatGPT
modify Task to conform to Equatable
Response from chatGPT
Sure, here's how you can modify the Task struct in Task.swift to conform to the Equatable protocol:
Task.swift
 1struct Task: Identifiable, Equatable {
 2    var id = UUID()
 3    var title: String
 4    var completed: Bool = false
 5    var dueDate: Date?
 6    var status: TaskStatus = .notStarted
 7
 8    static func == (lhs: Task, rhs: Task) -> Bool {
 9        return lhs.id == rhs.id
10    }
11}
In this modified implementation, we added Equatable protocol conformance to the Task struct by adding the protocol name after Identifiable, separated by a comma. Then we implemented the == operator function, which compares two Task instances for equality based on their id properties.

Allow Tasks to be changed
The app can now display a list of tasks with a title, due Date and a status and new tasks can be added to the list. The next step is to make the Tasks editable.
Next prompt to chatGPT
make a task editable
Response from chatGPT
Sure, here's how you can make a task editable in the task management app:
Step 1: Add an isEditing property to the TaskViewModel class in TaskViewModel.swift.
TaskViewModel.swift
1class TaskViewModel: ObservableObject {
2    @Published var tasks = [
3        Task(title: "Task 1", dueDate: Date(), status: .inProgress),
4        Task(title: "Task 2", dueDate: Date().addingTimeInterval(86400), status: .notStarted),
5        Task(title: "Task 3", dueDate: nil, status: .complete)
6    ]
7    @Published var isEditing = false // add isEditing property
8}
Step 2: Add an Edit button to the ContentView that toggles the isEditing property.
ContentView.swift
 1struct ContentView: View {
 2    @ObservedObject var viewModel = TaskViewModel()
 3
 4    static let taskDateFormat: DateFormatter = {
 5        let formatter = DateFormatter()
 6        formatter.dateStyle = .medium
 7        return formatter
 8    }()
 9
10    var body: some View {
11        NavigationView {
12            List {
13                ForEach(viewModel.tasks) { task in
14                    if viewModel.isEditing {
15                        EditableTaskView(task: $viewModel.tasks[viewModel.tasks.firstIndex(of: task)!])
16                    } else {
17                        TaskView(task: task)
18                    }
19                }
20                .onDelete { indexSet in
21                    self.viewModel.tasks.remove(atOffsets: indexSet)
22                }
23            }
24            .navigationTitle("Tasks")
25            .navigationBarItems(
26                trailing: HStack {
27                    if viewModel.isEditing {
28                        Button("Done") {
29                            self.viewModel.isEditing.toggle()
30                        }
31                    } else {
32                        Button(action: {
33                            self.viewModel.tasks.append(Task(title: "New Task", dueDate: Date(), status: .notStarted))
34                        }) {
35                            Image(systemName: "plus")
36                        }
37                        Button("Edit") {
38                            self.viewModel.isEditing.toggle()
39                        }
40                    }
41                }
42            )
43        }
44    }
45}
TaskView.swift
 1struct TaskView: View {
 2    let task: Task
 3
 4    var body: some View {
 5        VStack(alignment: .leading) {
 6            Text(task.title)
 7            if let dueDate = task.dueDate {
 8                Text("Due date: \(dueDate, formatter: ContentView.taskDateFormat)")
 9                    .font(.caption)
10            }
11            Text("Status: \(task.status.rawValue)")
12        }
13        .foregroundColor(task.completed ? .gray : .primary)
14        .opacity(task.completed ? 0.5 : 1)
15    }
16}
EditableTaskView.swift
 1struct EditableTaskView: View {
 2    @Binding var task: Task
 3
 4    var body: some View {
 5        VStack(alignment: .leading) {
 6            TextField("Title", text: $task.title)
 7            if let dueDate = task.dueDate {
 8                DatePicker("Due date", selection: $task.dueDate, displayedComponents: .date)
 9            }
10            Picker("Task Status", selection: $task.status) {
11                ForEach(TaskStatus.allCases, id: \.self) { status in
12                    Text(status.rawValue).tag(status)
13                }
14            }
15            .pickerStyle(SegmentedPickerStyle())
16        }
17        .foregroundColor(task.completed ? .gray : .primary)
18        .opacity(task.completed ? 0.5 : 1)
19    }
20}
Step 3: Create two new views, TaskView and EditableTaskView, that will display the task information in read-only and editable mode, respectively. In EditableTaskView, use a Binding to allow the task to be edited and modified in place.
Step 4: Update the ContentView to display the EditableTaskView when the isEditing property is true

Fix Data Binding Error in EditableTaskView
The code generated to make the Task editable does not compile. There are a number of options with charGPT, the easiest of which is to just regenerate the code from the previous request. Alternatively, we can prompt chatGPT with the error message to see if it can provide a solution.
Next prompt to chatGPT
Cannot convert value of type 'Binding<Date?>' to expected argument type
'Binding<Date>'
Response from chatGPT
The error message "Cannot convert value of type 'Binding<Date?>' to expected argument type 'Binding
'" occurs because a Binding<Date?> cannot be directly assigned to a Binding . Here's how you can fix the error in the EditableTaskView:
Step 1: Declare a new Date property in EditableTaskView that will be used to store the current value of the due date.
EditableTaskView.swift
1struct EditableTaskView: View {
2    @Binding var task: Task
3    @State private var dueDate: Date? // Add new property
4
5    var body: some View {
6        // ...
7    }
8}
Step 2: In the initializer of EditableTaskView, assign the value of the task's due date to the dueDate property.
EditableTaskView.swift
 1struct EditableTaskView: View {
 2    @Binding var task: Task
 3    @State private var dueDate: Date?
 4
 5    init(task: Binding<Task>) {
 6        _task = task
 7        _dueDate = State(initialValue: task.wrappedValue.dueDate) // Assign initial value to dueDate
 8    }
 9
10    var body: some View {
11        // ...
12    }
13}
Step 3: Use the dueDate property to create a Binding
in the DatePicker.
EditableTaskView.swift
 1struct EditableTaskView: View {
 2    @Binding var task: Task
 3    @State private var dueDate: Date?
 4
 5    init(task: Binding<Task>) {
 6        _task = task
 7        _dueDate = State(initialValue: task.wrappedValue.dueDate)
 8    }
 9
10    var body: some View {
11        VStack(alignment: .leading) {
12            TextField("Title", text: $task.title)
13            if let dueDate = dueDate {
14                DatePicker("Due date", selection: Binding<Date>(
15                    get: { dueDate },
16                    set: { newValue in self.dueDate = newValue }
17                ), displayedComponents: .date)
18            }
19            Picker("Task Status", selection: $task.status) {
20                ForEach(TaskStatus.allCases, id: \.self) { status in
21                    Text(status.rawValue).tag(status)
22                }
23            }
24            .pickerStyle(SegmentedPickerStyle())
25        }
26        .foregroundColor(task.completed ? .gray : .primary)
27        .opacity(task.completed ? 0.5 : 1)
28    }
29}
With these changes, the dueDate property is used as an intermediary between the Binding<Date?> and the Binding
, allowing you to modify the due date value in place.

Task App broke
Now that there have been a number of changes to tasks, I asked chatGPT to update the unit tests.
Update unit tests
I will not detail the back and forth here as there were unit tests added that did not
match the app. The resoltion of these compile errors led to modifying the structs and
classes such as the addition of a TaskListViewModel and then some confucion on what
was in a TaskViewModel and TaskListViewModel. I eventually got the app to compile
again, but the ContentView had changed too much and the app had lost some
functionality. In addition clicking on a Task seemed to navigate to a subview withthe
same list of tasks and son on recursively. I did not spend too much time debugging
and instead chose to roll back the code to when it was last working.

Add unit tests to Task
It is possible to "Regenerate response" for every response in ChatGPT with an option to toggle between the different responses. It is also possible to go back to a previous request and edit it and then save and submit. This removes the previous response and any subsequent request and responses.
After getting so lost with resolving compile errors with the updated unit tests and the introduction of new ViewModels and ultimately loosing functionality in the app I went back to the request to update the unit tests. This time, I specified to just add unit tests for Task. I also rolled back the code from git. Even adding these unit tests took a couple of attempts.
Next prompt to chatGPT
Add unit tests for Task
Response from chatGPT
Sure! Here's an example of how you could write some unit tests for the Task struct.
TaskTests.swift
 1import XCTest
 2@testable import TaskManager
 3
 4class TaskTests: XCTestCase {
 5
 6    // Test task creation
 7    func testTaskCreation() {
 8        let title = "Test Task"
 9        let dueDate = Date()
10        let status: TaskStatus = .notStarted
11
12        let task = Task(title: title, dueDate: dueDate, status: status)
13
14        XCTAssertEqual(task.title, title)
15        XCTAssertEqual(task.dueDate, dueDate)
16        XCTAssertEqual(task.status, status)
17        XCTAssertFalse(task.completed)
18    }
19
20    // Test task completion
21    func testTaskCompletion() {
22        var task = Task(title: "Test Task", dueDate: nil, status: .notStarted)
23
24        XCTAssertFalse(task.completed)
25
26        task.completed = true
27
28        XCTAssertTrue(task.completed)
29    }
30
31    // Test task status updates
32    func testTaskStatusUpdates() {
33        var task = Task(title: "Test Task", dueDate: nil, status: .notStarted)
34
35        XCTAssertEqual(task.status, .notStarted)
36
37        task.status = .inProgress
38
39        XCTAssertEqual(task.status, .inProgress)
40
41        task.status = .complete
42
43        XCTAssertEqual(task.status, .complete)
44    }
45
46    // Test task equality
47    func testTaskEquality() {
48        let task1 = Task(title: "Task 1", dueDate: nil, status: .notStarted)
49        let task2 = Task(title: "Task 2", dueDate: nil, status: .notStarted)
50        let task3 = Task(title: "Task 1", dueDate: nil, status: .notStarted)
51
52        XCTAssertNotEqual(task1, task2)
53        XCTAssertEqual(task1, task3)
54    }
55}
In this example, we have four test methods that cover some basic functionality of the Task struct:
- testTaskCreation: tests that a task is created with the expected properties and that completed is initially set to false.
- testTaskCompletion: tests that completed can be set to true and that the value is stored correctly.
- testTaskStatusUpdates: tests that the status property can be updated to each of the three possible values (notStarted, inProgress, and complete) and that the value is stored correctly.
- testTaskEquality: tests the implementation of Equatable by creating three tasks with different titles but the same values for dueDate, status, and completed. The test asserts that the two tasks with the same title are considered equal, while the one with a different title is not.
Of course, you could write additional tests to cover other scenarios or edge cases, but this should give you a good starting point.

Fix Failing unit test
One of the unit tests fails. Let's feed that back to ChatGPT to see what it recommends.
Next prompt to chatGPT
test testTaskEquality fails because task1 is not equal to task3
Response from chatGPT
I apologize for the mistake in my previous response. You are correct that the testTaskEquality test case should fail because the Task instances with different titles should not be considered equal. Here's the corrected test case:
TaskTests.swift
1func testTaskEquality() {
2    let task1 = Task(title: "Task 1", dueDate: nil, status: .notStarted)
3    let task2 = Task(title: "Task 2", dueDate: nil, status: .notStarted)
4    let task3 = Task(title: "Task 1", dueDate: nil, status: .notStarted)
5
6    XCTAssertNotEqual(task1, task2)
7    XCTAssertNotEqual(task1, task2)
8    XCTAssertEqual(task1, task3)
9}
In this corrected test case, we expect task1 and task3 to be equal because they have the same values for dueDate, status, and completed, even though their title properties are different. The assertion XCTAssertNotEqual(task1, task2) ensures that tasks with different titles are not considered equal, while the assertion XCTAssertEqual(task1, task3) ensures that tasks with the same values for the other properties are considered equal, regardless of their titles.
Unit Test is still failing.
Next prompt to chatGPT
test testTaskEquality still fails because the tasks have different id
Response from chatGPT
I apologize again for the mistake in my previous response. You are correct that the Task instances in the test cases have different id properties, which will cause the equality check to fail even if all other properties are equal.
To fix the testTaskEquality test case, you can create the Task instances with explicit id values that are the same for the two tasks with the same title:
TaskTests.swift
 1func testTaskEquality() {
 2    let id1 = UUID()
 3    let id2 = UUID()
 4
 5    let task1 = Task(id: id1, title: "Task 1", dueDate: nil, status: .notStarted)
 6    let task2 = Task(id: id2, title: "Task 2", dueDate: nil, status: .notStarted)
 7    let task3 = Task(id: id1, title: "Task 1", dueDate: nil, status: .notStarted)
 8
 9    XCTAssertNotEqual(task1, task2)
10    XCTAssertNotEqual(task2, task3)
11    XCTAssertEqual(task1, task3)
12}
In this version of the test case, we create two UUIDs (id1 and id2) and use id1 for both task1 and task3, so they will have the same id value. We also modify the assertions to use XCTAssertNotEqual for both task1 and task2 and XCTAssertEqual for task1 and task3, to ensure that tasks are only considered equal if they have the same id and all other properties are equal.

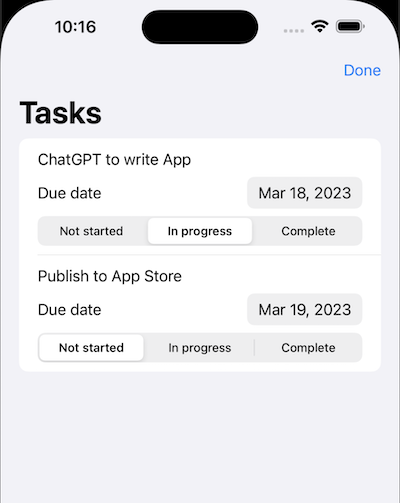
Editing tasks does not work
The App is now stable and it displays a list of tasks. Functionality like swipe to
delete works as well as adding new tasks. However, editing the tasks appears to work
until the done button is selected. Selecting edit again does show the previous
edits, but these are not persisted back to the model.
I'll continue this in the next article.

Edits to the Tasks are not shown in the task list - code generated by ChatGPT
Conclusion
I was pleasantly surprised by how much code chatGPT can generate. ChatGPT or other artificial intelligence tools are not likely to replace developers in the near future. However, I think a lot of work can be done by combining the artificial intelligence in a tool like chatGPT with the human ability to problem solve and design.
I think everyone should have a go at generating something with chatGPT. Perhaps this is the next version of auto complete, but it seems so much more as it is generating text or code and can be used to help solve technical problems
It is likely that we will get to the stage where there are those who use and work with Artificial Intelligence and those who don't and the advantage will be with those who embrace its use and learn to work with it. Of course, there are still a number of open questions with regard to copyright infringements and the law has not yet caught up all the technology we use. Is using code from chatGPT any different than searching for code on the Internet or GitHub and using that to help develop an application?
Working with chatGPT is very exciting and frightening at the same time. It has certainly given me pause to writing technical articles on solving issues that chatGPT could just spit out the answer for you whenever you need it. Although, the answers at the moment are not always right.
To answer the question "Can ChatGPT create an iOS app in SwiftUI?"
Yes and No
- Yes chatGPT can generate code to create an App.
- No because the user experience of using the App will not be good and the code may not work.
I would say currently that using chatGPT to help you write an app takes more time that writing the code yourself. As other people have stated chatGPT will give an answer with confidence, even when that answer is incorrect.
I am curious to continue working with chatGPT to further develop this TaskManager app. First to see how chatGPT suggests resolving the editing issue and then to persist the task data when the app is closed.
Source code for TasksAppWithChatGpt is available on GitHub.