Create patterns from basic shapes in SwiftUI
Many shapes can be created with Path in SwiftUI. Shapes and paths can be combined to create more complex shapes or patterns. This article shows how to create simple shapes and how to create a view of the back of a card with different patterns.
I started looking at animating flipping cards and then got side-tracked on representing the back of a card with some pattern rather than a plain color. I start the shape or layout with fixed sizes and then convert to relative size using GeometryReader. There are many different ways to create the back of cards, such as using a solid color or using an image. There are sf symbols for card suits such as "suit.diamond.fill" that could also be used as images to present a diamond shape, but this article is about creating the shapes from scratch.
Diamond View
Create a diamond using Path to specify drawing curved lines between the four
coordinates. GeometryReader is used to get the size of the view it is contained
within so that the diamond shape can be created to fit within the available space.
The control points for the curves can be adjusted to increase or decrease the curves
between the points. The offset variable is used in the following code to quickly
see the effect of modifying the control points.
 1struct DiamondView: View {
 2    var body: some View {
 3        GeometryReader { geometry in
 4            Path { path in
 5                let length = min(geometry.size.width, geometry.size.height)
 6                let width = length
 7                let height = length
 8                let middle = length * 0.5
 9                let offset = length * 0.1
10
11                path.move(to: CGPoint(x: 0, y: middle))
12                path.addQuadCurve(to: CGPoint(x: middle, y: 0),
13                                  control: CGPoint(x: middle-offset, y: middle-offset))
14                path.addQuadCurve(to: CGPoint(x: width, y: middle),
15                                  control: CGPoint(x: middle+offset, y: middle-offset))
16                path.addQuadCurve(to: CGPoint(x: middle, y: height),
17                                  control: CGPoint(x: middle+offset, y: middle+offset))
18                path.addQuadCurve(to: CGPoint(x: 0, y: middle),
19                                  control: CGPoint(x: middle-offset, y: middle+offset))
20            }
21            .fill(Color.red)
22        }
23    }
24}

Suit shapes in 100 by 100 grid
Creating the path directly in a view is good for experimenting, but once we have
tha path for the diamond shape we can extract the code into a shape structure. The
diamond is probably easiest of the four suit shapes to create. Another approach to
drawing a shape from scratch using path is to create a frame of 100 by 100 and create
the path within this grid.
  1struct SuitsView: View {
  2    var body: some View {
  3        VStack(spacing:50) {
  4            HStack(spacing:50) {
  5                Path { path in
  6                    path.move(to: CGPoint(x: 0, y: 50))
  7                    path.addQuadCurve(to: CGPoint(x: 50, y: 0),
  8                                      control: CGPoint(x: 40, y: 40))
  9                    path.addQuadCurve(to: CGPoint(x: 100, y: 50),
 10                                      control: CGPoint(x: 60, y: 40))
 11                    path.addQuadCurve(to: CGPoint(x: 50, y: 100),
 12                                      control: CGPoint(x: 60, y: 60))
 13                    path.addQuadCurve(to: CGPoint(x: 0, y: 50),
 14                                      control: CGPoint(x: 40, y: 60))
 15                    path.closeSubpath()
 16                }
 17                .fill(Color.red)
 18                .frame(width: 100, height: 100)
 19
 20                Path { path in
 21                    path.move(to: CGPoint(x: 50, y: 0))
 22                    path.addQuadCurve(to: CGPoint(x: 10, y: 43),
 23                                      control: CGPoint(x: 40, y: 30))
 24                    path.addArc(center: CGPoint(x: 20, y: 60),
 25                                radius: 20.0,
 26                                startAngle: Angle(degrees: -100),
 27                                endAngle: Angle(degrees: 50),
 28                                clockwise: true)
 29                    path.addLine(to: CGPoint(x: 40, y: 65))
 30                    path.addQuadCurve(to: CGPoint(x: 30, y: 90),
 31                                      control: CGPoint(x: 45, y: 80))
 32                    path.addQuadCurve(to: CGPoint(x: 30, y: 100),
 33                                      control: CGPoint(x: 20, y: 98))
 34                    path.addLine(to: CGPoint(x: 70, y: 100))
 35                    path.addQuadCurve(to: CGPoint(x: 70, y: 90),
 36                                      control: CGPoint(x: 80, y: 98))
 37                    path.addQuadCurve(to: CGPoint(x: 60, y: 65),
 38                                      control: CGPoint(x: 55, y: 80))
 39                    path.addArc(center: CGPoint(x: 80, y: 60),
 40                                radius: 20.0,
 41                                startAngle: Angle(degrees: 140),
 42                                endAngle: Angle(degrees: -70),
 43                                clockwise: true)
 44                    path.addQuadCurve(to: CGPoint(x: 50, y: 0),
 45                                      control: CGPoint(x: 60, y: 30))
 46                    path.addLine(to: CGPoint(x: 50, y: 0))
 47                    path.closeSubpath()
 48                }
 49                .fill(Color.black)
 50                .frame(width: 100, height: 100)
 51            }
 52
 53            HStack(spacing:50) {
 54                Path { path in
 55                    path.move(to: CGPoint(x: 70, y: 30))
 56                    path.addCurve(to: CGPoint(x: 30, y: 30),
 57                                  control1: CGPoint(x: 100, y: -10),
 58                                  control2: CGPoint(x: 0, y: -10))
 59                    path.addLine(to: CGPoint(x: 45, y: 45))
 60                    path.addCurve(to: CGPoint(x: 45, y: 70),
 61                                  control1: CGPoint(x: -15, y: 0),
 62                                  control2: CGPoint(x: -15, y: 120))
 63
 64                    path.addLine(to: CGPoint(x: 45, y: 70))
 65                    path.addLine(to: CGPoint(x: 30, y: 100))
 66                    path.addLine(to: CGPoint(x: 70, y: 100))
 67                    path.addLine(to: CGPoint(x: 55, y: 70))
 68                    path.addLine(to: CGPoint(x: 55, y: 70))
 69
 70                    path.addCurve(to: CGPoint(x: 55, y: 45),
 71                                  control1: CGPoint(x: 115, y: 120),
 72                                  control2: CGPoint(x: 115, y: 0))
 73
 74                    path.addLine(to: CGPoint(x: 70, y: 30))
 75                    path.closeSubpath()
 76                }
 77                .fill(Color.black)
 78                .frame(width: 100, height: 100)
 79
 80                Path { path in
 81                    path.move(to: CGPoint(x: 50, y: 25))
 82                    path.addCurve(to: CGPoint(x: 0, y: 25),
 83                                  control1: CGPoint(x: 50, y: -10),
 84                                  control2: CGPoint(x: 0, y: 0))
 85                    path.addCurve(to: CGPoint(x: 50, y: 100),
 86                                  control1: CGPoint(x: 0, y: 60),
 87                                  control2: CGPoint(x: 50, y: 80))
 88                    path.addCurve(to: CGPoint(x: 100, y: 25),
 89                                  control1: CGPoint(x: 50, y: 80),
 90                                  control2: CGPoint(x: 100, y: 60))
 91                    path.addCurve(to: CGPoint(x: 50, y: 25),
 92                                  control1: CGPoint(x: 100, y: 0),
 93                                  control2: CGPoint(x: 50, y: -10))
 94                }
 95                .fill(Color.red)
 96                .frame(width: 100, height: 100)
 97            }
 98
 99            Spacer()
100        }
101    }
102}

Diamond Shape
The shape is extracted into a shape struct once we have defined the shape in the 100
x 100 grid. The Shape protocol has one required function to define the Path to
draw within the given CGRect. Defining a structure that implements the Shape
protocol allows us to dispense with the use of GeometryReader as the Shape is
passed in the rectangle size of the view that contains it. A size parameter is set to
the minimum of the height and width so the shape will fit into the view. The specific
points for the view size are adjusted from the 100 x 100 template to the passed in
CGRect. There is also either a horizontal or vertical adjustment if the view is not a
square so the shape is displayed in the center of the view.
 1struct DiamondShape: Shape {
 2    func path(in rect: CGRect) -> Path {
 3        let size = min(rect.width, rect.height)
 4        let xOffset = (rect.width > rect.height) ? (rect.width - rect.height) / 2.0 : 0.0
 5        let yOffset = (rect.height > rect.width) ? (rect.height - rect.width) / 2.0 : 0.0
 6
 7        func offsetPoint(p: CGPoint) -> CGPoint {
 8            return CGPoint(x: p.x + xOffset, y: p.y+yOffset)
 9        }
10
11        let path = Path { path in
12            path.move(to: offsetPoint(p: CGPoint(x: 0, y: (size * 0.50))))
13            path.addQuadCurve(to: offsetPoint(p: CGPoint(x: (size * 0.50), y: 0)),
14                              control: offsetPoint(p: CGPoint(x: (size * 0.40), y: (size * 0.40))))
15            path.addQuadCurve(to: offsetPoint(p: CGPoint(x: size, y: (size * 0.50))),
16                              control: offsetPoint(p: CGPoint(x: (size * 0.60), y: (size * 0.40))))
17            path.addQuadCurve(to: offsetPoint(p: CGPoint(x: (size * 0.50), y: size)),
18                              control: offsetPoint(p: CGPoint(x: (size * 0.60), y: (size * 0.60))))
19            path.addQuadCurve(to: offsetPoint(p: CGPoint(x: 0, y: (size * 0.50))),
20                              control: offsetPoint(p: CGPoint(x: (size * 0.40), y: (size * 0.60))))
21            path.closeSubpath()
22        }
23        return path
24    }
25}
A sample of diamonds are displayed in a vertical stack to ensure the shape is displaying correctly. The background color is set to gray so the placement of the diamond in the frame can be easily seen.
 1struct DiamondShapeView: View {
 2    var body: some View {
 3        VStack {
 4            DiamondShape()
 5                .fill(Color.purple)
 6                .frame(width: 50, height: 80)
 7                .background(Color(#colorLiteral(red: 0, green: 0, blue: 0, alpha: 0.2020861898)))
 8
 9            DiamondShape()
10                .fill(Color.green)
11                .frame(width: 100, height: 100)
12                .background(Color(#colorLiteral(red: 0, green: 0, blue: 0, alpha: 0.2020861898)))
13
14            DiamondShape()
15                .fill(Color.blue)
16                .frame(width: 300, height: 200, alignment: .center)
17                .background(Color(#colorLiteral(red: 0, green: 0, blue: 0, alpha: 0.2020861898)))
18
19            DiamondShape()
20                .fill(Color.red)
21                .frame(width: 300, height: 300)
22                .background(Color(#colorLiteral(red: 0, green: 0, blue: 0, alpha: 0.2020861898)))
23        }
24    }
25}

Repeating rows and columns
Different patterns can be created using the shape, once the shape has been defined.
once again, GeometryReader is used to layout the view by calculating each diamond
width and height based on the available space in the view.
 1struct CardView1: View {
 2    let rows = 10
 3    let cols = 8
 4
 5    var body: some View {
 6        VStack {
 7            GeometryReader { gr in
 8                let width = gr.size.width / CGFloat(cols)
 9                let height = gr.size.height / CGFloat(rows)
10
11                VStack(spacing:0) {
12                    ForEach(0..<rows) { _ in
13                        HStack(spacing:0) {
14                            Group {
15                                ForEach(0..<cols) { _ in
16                                    DiamondShape()
17                                        .fill(Color.red)
18                                        .frame(width: width, height: height)
19                                }
20                            }
21                        }
22                    }
23                }
24            }
25            .frame(width: 300, height: 500)
26            .background(Color(#colorLiteral(red: 0, green: 0, blue: 0, alpha: 1)))
27        }
28    }
29}

Patterns based on rows and columns
Different patterns can be created by varying the numer of diamond shapes in rows and columns. The card view is extracted into a separate struct with parameters for the number of rows and columns. Another addition is the offset of alternating rows, which are set to contain one less diamond shape.
 1struct DiamondCardView: View {
 2    var rows :Int
 3    var cols: Int
 4
 5    var body: some View {
 6        GeometryReader { gr in
 7            let width = gr.size.width / CGFloat(cols)
 8            let height = gr.size.height / CGFloat(rows)
 9
10            VStack(spacing:0) {
11                ForEach(0..<rows) { i in
12                    let rowCols = (i%2==0) ? cols : cols - 1
13                    HStack(spacing:0) {
14                        Group {
15                            ForEach(0..<rowCols) { _ in
16                                DiamondShape()
17                                    .fill(Color.red)
18                                    .frame(width: width, height: height)
19                            }
20                        }
21                    }
22                }
23            }
24        }
25    }
26}
 1struct CardView2: View {
 2    var body: some View {
 3        VStack {
 4            HStack {
 5                DiamondCardView(rows: 9, cols: 7)
 6                    .frame(width: 150, height: 250)
 7                    .background(Color(#colorLiteral(red: 0.1215686277, green: 0.01176470611, blue: 0.4235294163, alpha: 1)))
 8                DiamondCardView(rows: 21, cols: 10)
 9                    .frame(width: 150, height: 250)
10                    .background(Color(#colorLiteral(red: 0.9568627477, green: 0.6588235497, blue: 0.5450980663, alpha: 1)))
11            }
12            HStack {
13                DiamondCardView(rows: 3, cols: 3)
14                    .frame(width: 150, height: 250)
15                    .background(Color(#colorLiteral(red: 0, green: 0, blue: 0, alpha: 1)))
16                DiamondCardView(rows: 1, cols: 1)
17                    .frame(width: 150, height: 250)
18                    .background(Color(#colorLiteral(red: 0.9764705896, green: 0.850980401, blue: 0.5490196347, alpha: 1)))
19            }
20        }
21    }
22}

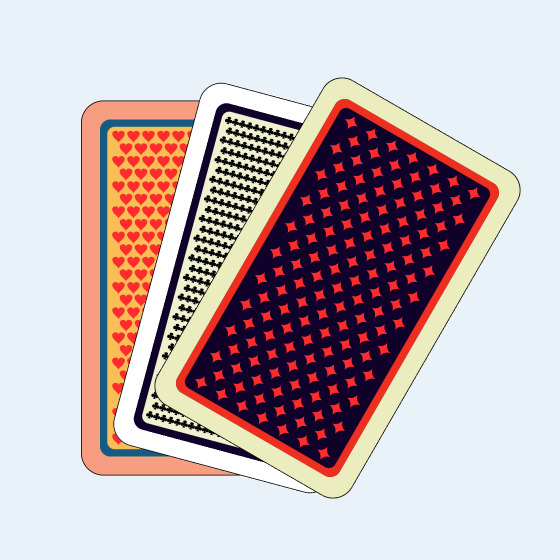
Card back
The back of playing cards frequently contain some kind of border around the central pattern. The following code uses the Overlay modifier to add three borders to create a card as well as using rounded corners on the card.
 1struct CardView3: View {
 2    var body: some View {
 3        DiamondCardView(rows: 21, cols: 7)
 4            .padding(40)
 5            .frame(width: 300, height: 500)
 6            .background(Color(#colorLiteral(red: 0.06274510175, green: 0, blue: 0.1921568662, alpha: 1)))
 7            .cornerRadius(30)
 8            .overlay(RoundedRectangle(cornerRadius: 40)
 9                        .stroke(Color(#colorLiteral(red: 0.9301124811, green: 0.940382421, blue: 0.766456604, alpha: 1)), lineWidth: 50)
10                        .cornerRadius(30))
11            .overlay(RoundedRectangle(cornerRadius: 20)
12                        .stroke(Color(#colorLiteral(red: 0.9254902005, green: 0.2352941185, blue: 0.1019607857, alpha: 1)), lineWidth: 20)
13                        .cornerRadius(15)
14                        .padding(25))
15            .overlay(RoundedRectangle(cornerRadius: 30)
16                        .stroke(Color(#colorLiteral(red: 0, green: 0, blue: 0, alpha: 1)), lineWidth: 2)
17                        .cornerRadius(30))
18    }
19}

Conclusion
Any shape can be created with Path in SwiftUI. Path can be defined directly in views
and the GeometryReader can be used to determine the available space to calculate
shape lengths. When a shape is going to be used multiple times in an App, then a
custom shape can be created by defining a struct that implements the Shape
protocol. This requires just one function to be defined and that is the path()
function, which returns the path for the shape. This article showed how to define
shapes for the four card suits, even though these are available in some fonts and in
the SF symbols. Once the basic shapes were defined, it is possible to create patterns
using these shapes. This has just scratched the surface and there are so much more
patterns that could be created with different combinations, rotations and overlays.